Thursday, November 18, 2010

Beaded Wire Snowflakes- Tutorial

With the snow earlier this week and non-stop Christmas music playing over Pandora I think I've finally achieved that Christmas Spirit I've been lacking til now. It's fun and wonderful and I rarely stop smiling. Which, if you saw my to-do list, you would consider nothing less than a Christmas Miracle. I know my husband does. Despite all the work getting ready for the events last week, and my big Handmade MN show this weekend, I am loving it all. So to spread a little of the Christmas Spirit I thought I'd show you how to make my favorite Beaded Wire Snowflakes. So go grab yourself a mug of hot cocoa, a peppermint stick or two, and sit back, relax and Enjoy the tutorial. :)
------------------------------------------------------------
Beaded Wire Snowflakes Tutorial
Gather Your Tools and Materials:
Roll of 16-gauge steel wire (Grip-rite)
Roll of 19-gauge steel wire (darice)
A few sparkly silver or blue beads
Needle nose pliers (garage)
Wire cutter (somewhere around)


Step One: Bend one end of  your 16-gauge steel wire in and under so that the cut end is blunt against the rest of the wire. *This is important to do right away whenever you're working with wire because it will protect your hands from getting too scratched up.* In this tutorial it's also a nice design element.

Step Two: Measure from the bend end of your wire 6 1/2" or so and cut your wire from the spool. Then bend that end of the wire to match your other end. In the beginning it might be hard to gauge where to make that bend so it matches, but if you just let your fingers do it, they'll find a rhythm and your bends will start to be consistent. Just don't worry about it too much if they're uneven.

Step Three: Repeat to create a total of 6 of these pieces. Then, grip two together in one hand at about an inch from one end (as shown), and using your other hand and the 19-gauge wire, begin to wrap about an inch away from an end. Wrap to end, and then around end.


Step Four: Now use your wire to finish wrapping them together, go around the end a few times, and then cut close. Using your needle nose pliers bend the cut end in so that it won't stick out and scratch. Check your other cut end as well. Repeat to wrap other 4 wires to create a total of 3 wrapped together wire pieces.


Step Five: In your hand, assemble the wires into a snowflake shape by laying them across one another so they all intersect at their middles, as shown. Grip your 19-gauge wire about 2"-3" from end, and then use it to wrap around the intersection several times. Then move around the center intersection, wrapping the wires into position.


Step Six: Bend in your cut end if it's protruding, and then cut the wire close and bend end in to center to secure. If your snowflake seems a little wobbly at this point, grab your needle nose, and flip the snowflake over and give a wire or two a good twist to tighten bind. You should have a 3" piece of wire still sticking out from center.


 Step Seven: Thread a bead onto this wire and position so that it is centered to the middle of your intersection. Wrap the extra wire, and bend in your cut end to complete. AT THIS POINT: you may want to use your 19-gauge steel wire to add beads to the each of your 6 ends as well. The extra beads really catch the light and look soo sparkly. Another way of finishing off the snowflake is to cut thin strips of cloth and tie to each end. You may also choose to spray paint your snowflake. Totally up to you how you'd like to embellish the ornaments. So have fun!!!


PS- to hang these I bend my 16-gauge steel wire to create an "S" hook. It's easy, matches the ornament, and looks great hanging from my iron chandelier. ;)

Monday, November 15, 2010

An Eventful Weekend

It was an eventful weekend to be sure! On Friday I was able to go pick up the fresh flowers for my Sunday event. Gorgeous, amazing, beautiful flowers, it's always a treat to pick them out. The wholesaler I get them at is in downtown Minneapolis, I live in a suburb so it's just a bit of a trip. Then I took them over to church and stripped the leaves, prepped the flowers, got them in buckets of water, etc. That done, I went home and made sure I had everything I needed for the next morning. Piece of cake. ;)

When I woke up Saturday morning my first thought as I looked out the window, was "wow- am I glad I don't have to go downtown today". In the night it had started to snow and we had inches of the white stuff covering everything. It was such a heavy, wet snow, that it bent over the branches of smaller trees and shrubs. Everything looked as if it was bowing down. And white. So white. Such a transformation from earlier in the week. On the Monday prior my son wore shorts to school and played outside for almost two hours. Usually the interlude between fall and winter is a little more gradual.

It is Minnesota though, and we are pretty resigned to snow at this time of year so I got in the car and headed out into it. I had flowers waiting. :) It took a while to get to church, we live 15 miles or so away, and without plows or sand it took almost an hour to get there. There were a lot of spin outs, many cars in the ditches, a semi that was jack knifed- all the usual. Winter had definitely returned. :)By the time I left church, later that day though, the plows had been out, the roads were sanded, and the driving was good.

The flowers turned out beautiful, I was lucky enough to have a friend come over and help, which made it even more fun, and they looked so beautiful on the tables Sunday. I really enjoyed being able to play with them again, it's been a little while. Then, Sunday afternoon, the interlude over, it was back to my wire and fabric as I get ready for the Handmade MN show this weekend.


Friday, November 12, 2010

Here, There, and Everywhere.

Super "Sweets" Christmas Display
Today I'm running here and there picking up fresh flowers from the wholesaler, prepping the flowers, searching for lost supplies in my garage, and generally running around circles. Still some things are getting accomplished. For instance, I've found a few things in my garage I didn't know were there. I've also been able to pick up a few Christmas trends. What, you may wonder, am I up to?

Well, each fall I dust off my floral designer apron and do the flower arrangements for a couple of events at my church. The largest is this Sunday so I've been prepping and sourcing all the flowers and drygood supplies I need to put those arrangements together tomorrow.

But in the midst of the running to the local wholesalers to pick up the supplies I need, I've glimpsed some pretty wild Christmas displays. Which has been really fun. I snapped a few pics for  you guys that I'll share with you soon. These wholesalers are always at the very edge of super trendy when it comes to seasonal floral or permanent floral displays and it was fun to kind of soak up their installations.

Inside the floral cooler!
Something I wanted to quick tell you all though is that my book, Creative Bloom: Projects and Inspiration with Fabric and Wire is also here, there, and everywhere. I just found out that it is now available as an e-book for the Kindle, and is also available in the ibook format through iTunes. I got the sample from iBooks yesterday. Kind of fun- now I can tell someone about my book and pull out my phone and show them a few pages besides. So I thought I would let y'all know too. :) 

I'll be back on Monday with some pictures from the weekend. Just a quick reminder though- the Handmade MN market is next weekend. If you're local you will NOT want to miss this event!! For more details look here.

Thursday, November 11, 2010

Saying Hello with Fabric and Wire- Easy Greeting Card Tutorial

I had the opportunity to make a greeting card this morning and thought I'd snap a few photo's as I go. It really is quick, easy, and I think still has that handmade charm. Of course, you can vary your wire shape, you could vary the shape of your fabric pieces. You could throw in a little paper or a stamped image on the paper. You could shape your wire like a bird or leaf, and use Christmas of fall fabrics...You really can go all over the place from here, my more simple version here can just be your jumping off point. So take a look, and Enjoy!!
--------------------------------------------------------------
I Heart Easy- Greeting Card Tutorial
What you need:
A blank piece of paper (8 1/2"w. x 11"h.)
A few scraps of fabric, one square, one long and thin
A wire heart made of 16-gauge steel wire
Embroidery Floss
Needle
Uhu Glue stick
Scissors

Step One: Fold your piece of paper in half to form a card that is 8 1/2"h. x 5 1/2"w. Then grab your glue stick and apply glue to the back of your fabrics.


Step Two: Stick fabric on front of card where desired. Press down and smooth flat for good adhesion.


Step Three: Position your heart on your card where you'd like it. Then, mark or hold down the heart and poke holes on either side of the wire on each side of the heart. So you're making a total of 4 poke holes. A good tip here is to stagger slightly your pokes by about 1/8" so that the paper is less likely to tear.


Step Four: Thread your needle with a piece of embroidery floss, knot one end of the floss, and then from the inside of the card insert your needle through one of your holes. Come up on the front side and then go down through the hole next to it. This will anchor your stitch somewhat.


Step Five: Then come up to the front from the back a second time and this time stitch over one side of your wire heart. Repeat a couple of times and then knot and trim the thread on the back side of the card.
Repeat steps four and five on the other side of your heart to securely stitch heart to paper.Then, write or stamp your greeting inside the card and Voila! A stitched, fabric and wire card that's both easy and super cute!

Wednesday, November 10, 2010

My Reindeer, Christmas Birds, and Ornaments- Oh, My!

I've been hard at work trying to finish up some of my Christmas projects and last night I listed most of them! Wow does that deserve a Whoo-hoo. It's been so difficult this year to motivate myself to craft Christmas. I could blame it on all the warm weather, but there is something in my psyche that doesn't want to think Christmas until it's after Halloween. What's a girl to do? It was Moda to the rescue! I love all their lovely lovely Christmas fabrics and once I had a stash I was ready to go.  
So first, I did this-

Then I finished a few of these-
Next I did one of these cute little Christmas Brooches-
And then just because did six of these-
I finished up with the little birdie at top. I think I've got a groove now. What are you working on? I'd love to know if you have any Christmas projects planned ! :)

Tuesday, November 9, 2010

Any Excuse to Play

I haven't been playing much lately. It feels like there isn't time for anything extra. Still I know I need to make time to play with my art. If not, it starts to drag on me and I lose the passion I have for it.

Not long ago I volunteered to help with bulletin board projects in my son's classroom. Honestly, I thought this meant that the teacher gave you the supplies and a sketch and you stapled it all up according to her plan. Not a big deal- I can usually follow instructions (although a picture helps me lots). But what it actually entailed was coming up with the entire design/concept and then executing it. Again, a little more than I thought, but that's ok. But then I saw it at the bottom of the e-mail, "thank you for sharing your talents in this way." That got me.

Suddenly I saw this as a challenge, as a reflection of me. Now keep in mind that it's just a bulletin board but internally I was putting this up there with all the other big challenges I've had and I have to admit to being a little intimidated. Then I calmed down and realized this for what it was- an opportunity to play and an opportunity to share what I love with others.

So I went to the fabric store. Any excuse, right? I got some gorgeous warm yellows and oranges that gushed "thanksgiving" to me. Then I came home and cut the fabrics into scrap sizes and started to layer them onto the fusible interfacing (paper side down). My idea was to make patchwork style cornstalks with cobs that each child would write what they're most thankful to God on. Surrounded with fabrics, playing with patterns, I was suddenly conscious of enjoying myself immensely. Fabric is so much about color, texture, and patterns for me. Visiting a fabric store gives me the kid on Christmas eve feeling. I love it. It's all the raw material to create with.

Layer fabric scraps onto fusible interfacing and iron flat

To cover any holes I had I cut some small fused pieces, peeled off the paper backing, and laid them vertically across holes

Layering creates a patchwork effect and then I ironed the pieces to fuse them in place

To complete, cut into desired sized shapes or strips as shown

The bulletin board turned out well. I had a little trouble with the execution and cut my background paper too small. twice. but I managed to patch it the second time and put a cornstalk over the seam. The kids answers were so cute, and best of all I played.

Monday, November 8, 2010

How to Arrange a Market Bouquet

This weekend I had the chance to get a few flower market bouquets to arrange for a function at my church. When I was a florist I'd frequently hear people complain about how to work with the bouquets their husband would bring home. They never look right just as they are but they didn't have the ability to rearrange them and make them look good either. Some girls would rather their husband not bring them flowers at all if they had to arrange them in a vase themselves.
But not everyone wanted to buy their arrangements already vased either, since most of us have half a dozen of vases at home already. So what to do?
Create hand held bouquets that are tied with string so that when you give the flowers to someone all they have to do is set the bouquet in a vase and clip the string for a fabulous vase arrangement. It's fun, easy, and also solves the problem of how to design with one of those pre-made bouquets.With this in mind I snapped a few pics as I was working on these hand-tied's for church and have a little "how to" for you. Enjoy!

How to Make Hand-Tied Bouquets from Market Bunches of Flowers

What you need:
One or more market bouquets of fresh fall flowers
Extra floral material clipped from your yard- I had some dry hydrangea and some spirea branches
Waxed thread or string
A clippers of some sort (I use Japanese floral shears)

Step One: Open up your bouquet/s and seperate all the flowers so that you know what you have to work with. Usually these mixed bouquets come with a couple of focal flowers (like sunflowers, roses, dahlia's), a couple of tall flowers (eucalyptus, ruscus, the cattail, liatris), some multi stemmed flowers (like mums), some filler flowers (like solidago, mini asters, baby's breath, or waxflower), and a few greens (examples of greens is the salal leaves that are usually included, or seeded eucalyptus, or fern). Lay them all in separate piles on the counter in front of you.

Step Two: Take off the leaves from the bottom 2/3 of the flower. It really is important not to have any flower leaves in the vase water. Not only does it muck up the water but it really does shorten the life span of the bouquet. Just a note here: During the week if your water starts to get a greenish tint then change the water. If you don't have more preservative to add don't worry. Fresh CLEAN water is the best thing you can do even if there's nothing in it.


Step Three: Pick up the center flower. I usually use the largest or bulkiest flower head first. In this case it's the dried hydrangea.Hold it in your hand and then add one or two of the taller flowers. Hold it in your hand next to the hydrangea. Then give the bouquet a quarter of a turn clockwise and lay one of your focal flowers diagonally across the stems you're already holding. Your stems should look a bit like you're creating an "x". Give the bouquet another slight turn in your hand. Through out this process you never set the bouquet down.

Step Four: Continue to pick up flowers and add them stem by stem to your bouquet. Always adding them at an angle and laying them across the stems in your hand. What I'll do is add a focal flower, turn. Then add a filler flower and turn. Then add a spray flower, and turn. Continue working around the bouquet adding your stems.


Step Five: When you've all the flowers you want to include arranged in your hand you then want to add your "collar" of greens. This isn't necessary but is a really pretty way of finishing off your bouquet. Continue in the method used above to add the flowers but start to add your stems of salal or seeded eucalyptus as you turn the bouquet. I like adding in some wispy, woody, or sticky-outy stems at this point. These aren't usually included in the flower bouquet but are usually available seperately. I usually grab something out of my yard though. Tall grasses, beargrass, spirea branches, or forsythia all look great. Alternate these with the traditional greens that might have bee included in your market bunch.


Step Six: When done adding greens, open up your grip a bit and let your bouquet fall a little loose in your hand. Pull or push any stray stems into your bouquet to make a pleasing shape. Add any additional stems to fill out, or any delicate accent pieces now. Hold tight again. Using your waxed thread wrap around your stems a few times as you're holding it in your hand and then pull tight and set the bouquet down to tie. Do not loose the shape of your bouquet as you're doing this. Then, holding your bouquet over a garbage use your shears or a sharp scissor/clippers to trim off the extra stem from your bouquet. Cut all
the stems flush and even to desired length.

Step Seven: If you're doing several bouquets like this you'll want to put the finished bouquets in some water right after you clip them. You can transport them out of water but give them a fresh cut before they go in the vase. Also, before you vase them you'll want to snip your thread and them plunk them into the vase filled with lukewarm water. Add preservative to this water as well. Then, step back and take a look at your bouquet, turn it around and see if it needs a little final "finessing". A little tuck there, a little pull there, maybe you want to move something to craft the arrangement better. Then, set in place and enjoy!!!

Saturday, November 6, 2010

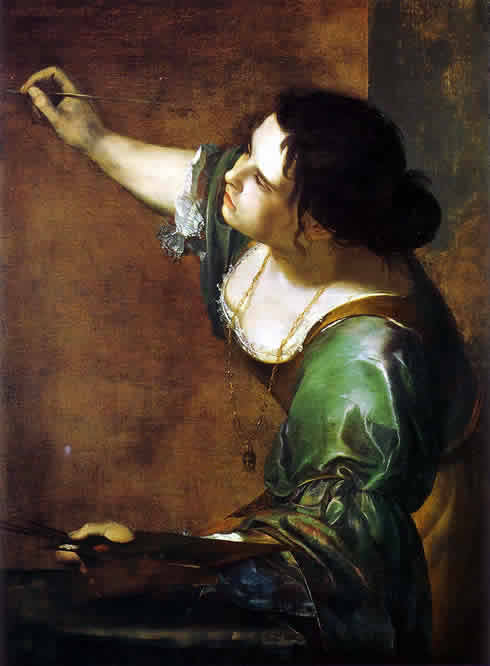
Jack of All Trades or Renaissance Woman?

Artemisia Gentilleschi as the Allegory of Painting
Often we get an idea that seems like this great big idea. But as we execute it we realize that really it's just part of the really really really big idea. It's like an entry point that's doable and because we don't realize what it leads to we're able to see it as possible. Think about it this way. If you started dating your future husband with the idea immediately that he was THE ONE...well, would you have been as casual and "you" or would you have clammed up and run from the bigness of it all? Not to say that we don't date someone with the idea that they might be "the one", but I never felt certain one way or another until we'd spent some time together.

Similarly, so many of us feel badly about how we flit from one craft to another, not really ever "settling" down. I hear that so often and I can relate. At one time my husband got so frustrated over my constantly shifting devotion to one craft or another that he told me "I was going to end up a jack of all trades and a master of none." The idea is that if we really put our time, energy, and concentration towards one area of art that we'll master it. Good advice generally, but I really don't think it's good advice to give you. Here's why:

1) Most of us are in a learning stage where it's a good idea for us to acquire as many skills as we can. You'll never know when you'll feel inspired to combine your knitting, soldering, and stitching skills to create something absolutely amazing. Early learning needs to encompass all sorts of areas so that the student can begin to make connections across those different areas. If we concentrate on solely one thing we won't develop that ability to cross over which really is important.
2) Unless we try different things we won't find that something we just "Love" to do and feel passionate about. Great art expresses passion somehow, and a great art life allows us to do that everyday. Back to the dating analogy, very few of us meet the love of our lives in kindergarten. We need to expect that we'll go through an awful lot of "Mr. Wrong's" before we'll find that one "Mr. Right" for us.
3) We also need to be ready for that relationship when it comes. That process of becoming ready comes through time and by relating to others. All those relationships with "Mr. Wrong" prepared and matured me so that when my "Mr. Right" did come along I knew how to relate to him without completely messing it up.
4)Knowledge is never wasted. Neither is excitement. Feeling intrigued and excited about something new keeps me going. I love trying new products, finding new tools, or seeing new ideas at work. It feeds my creative energy and keeps me fired up about creating. I still love my fabric and wire but trying a new painting technique, or learning a new skill opens up new possibilities and makes new combination's possible.

Back to the Big Idea. If you're still searching for that something you "LOVE" than don't chastise yourself for not having found it already, or for not just sticking with something. Don't settle, do enjoy the journey and please don't feel like you're wasting time by pursuing new things. The small tangent that leads to a big idea could be just what you need to take you to that next big idea. The journey is also what readies you for when you do get a glimpse of that really really "big idea". So love where you are. Love that you have a passion for lots and lots of things. Love that you have a curiosity and an ability to embrace the new. It really is a strength. 

Don't see yourself as a "jack of all trades and a master of none" but as a Renaissance woman in process. Someone who someday will have an incredible amount of skills and experience available to her. That could be you. That will be you. You just need to see the value in your journey now and not lose faith in yourself and your seeking. :)

Thursday, November 4, 2010

Focusing....

Last night my husband walked up to me and said he was having a hard time focusing. I jumped in, as only a girl will do, with "I know! Me too!". He looked at me, cocked his head a little and I went on about how I can't seem to focus on any one task, I have so much to do and feel like I can't concentrate enough on any one thing enough in order to actually make progress. There's too much and it's all over the board- everything from blog posts to christmas ornaments to a couple events at my church I'm doing the flowers for again, to housecleaning, grocery shopping, and laundry. His look got even funnier and then he said, "I just meant I wasn't seeing well. My eyes haven't been focusing." Oops.


Isn't it funny how we give personal meaning to casual comments others make? I've seen it in my art too and have actually grown to anticipate it. Often it isn't even up to me to find the meaning in one of my sculptures. It's up to me to make it and others who see it will give it meaning. It's a two part act of creation that takes interaction from both maker and beholder. I love that- but it's a little scary too.
It means we can't control what others will feel or see or interpret our work as. We can't hand it to them and expect them to react the way we did. I'm trying to remember the gift that is right now as so many of you are beginning to get your books. My words, my work that YOU will read, interpret and apply (hopefully) to your artist self. The joy in this is that many of you will take from the book so much more then even I could have guessed. You'll internalize it, you'll mull it over, and you'll pull out the parts that really challenge you or speak to you. Your experience with the book will be so different then mine, as the creator.

I'm starting to see the book "out there". It showed up in the latest Somerset Studios yesterday. Even better, I'm also starting to hear from those who have the book what they're reaction to it's message is. A card in the mail, a post it note that says "good book", a casual comment like "wow- it's bigger than I thought". I love hearing them all. One in particular I can share with you, Shelley from Singlestone Studios has been with me through this whole process and has waited so so patiently to receive her copy. She wrote a wonderful blog post about the book that really hammered home to me how differently each reader will receive this book. She really highlighted for me the fact that your experience as a reader isn't the same as mine as the writer and how really wonderful that is. Last night I sat down, and because I couldn't focus on any of my other tasks, I decided to re-read my book. I tried to read it not as the author but as someone else might. I decided it's not possible. I wrote this book, it's my experiences, it's my life, and my art, and it wasn't created for me. It was created for you. So this is my stone throw for the week-I'm asking what you think. If you have read the book, and feel moved to share I would LOVE to hear from you what your reaction to it is. Write a post about it, send me an e-mail at birdfromawire@gmail.com, write a review of it on Amazon, or leave a note on my fb page. Tell me what you think and from the bottom of my heart- thank you. :)

Tuesday, November 2, 2010

Gratefulness

Today I'm feeling so grateful for so many reasons. This weekend I worked on getting my book's pre-orders packed up and shipped out. I got a little carried away on the wrapping and goodies. There weren't a ton and I was feeling so very very grateful I threw in a scribble heart for everyone as well. Of course, that made the boxes heavier and I came very very close to losing money on these once I'd shipped them (so there are no longer any pre-order specials on this blog). :) I had lots of fun putting them together though and can't wait for them all to get their packages. It's exciting to anticipate.

Back to making stuff- before I was so joyously interrupted by the Fed ex guy on Friday, I was working on a little how to for a bulletin board I'm working on for my son's classroom. My idea was to make cornstalks and then on each corn cob write something each student was thankful to God for. They're kindergartners so their answers are pretty cute. I'm off in a few minutes to go cut the letters on one of those cricut machines so I'll post pics of it all finished later today or tomorrow. The techniques I used to make the cornstalks was fun so I'll give you the step by steps on those tomorrow. I'm sure you could find other uses for it- such as a Thanksgiving themed table runner, or to make a patchwork garland, or placemats, among other things :)

One more gratefulness: I want to say thank you to all of you who have been so supportive of me as I worked through the process of creating and then introducing this book. It's been a huge journey of faith and friendship for me and I am so Grateful. Thank you.