
Ran into this blog this morning- and HAD to share right away. Although I love what I'm doing I keep having the nagging suspicion I should be doing more to help others with my art. So I did some googling this morning about micro loans, handicraft businesses in third world countries, and how artists are using their talents to help others. This blog is going to be a great resource.
It's The Art of Helping Others to view click here.
I'd love to have any of you share what your thoughts are on this or any resources you've found. Thanks!!!
Sunday, February 28, 2010
The Difference Between Wishes and Dreams
 Last week as I was watching the Olympics, the newscaster was telling a quick little anecdote about one of the bobsled athletes that caught my attention. This 20 something athlete had first heard about the Olympics as a child, when her school had a staged a small Olympic program to celebrate the games that were happening that year. She says that her dream to be an Olympian started on that school platform. I wondered, how many other kids were there participating with her that might have had the same wish as she- to one day participate in the Olympic games? How many of children the world over have watched these last two weeks and in the watching formed their own Olympic dreams? Then it came to me, the difference between a wish and a dream.
Thousands of children may wish to participate someday. Hundreds may dream of it, but for some, a very few, the wish became a dream, and the dream became a goal. Why? Why do some of us have a passing wish to do or be something, and to others it becomes a dream? Why do we have the dreams we do? Last year, I read somewhere that our dreams and abilities are given to us by God. They are desires given to us and they can be seen by us as a clue to our purpose. I believe we all have a purpose, we were all given lives that can be fruitful, AND fulfilling. The trick for many of us is discovering that purpose. That's where prayer, and the desires of our hearts can be our clues.
When I was a child I wanted to be a lot of things. I wanted to be a doctor, a fashion designer, a poet and an artist. But as I grew, the one burning desire I couldn't put aside was the dream to be an artist. I knew how far fetched that was- but it got to the point I didn't care. It felt good and right to create. I knew it was a part of me that I needed to pay attention to, that God was directing me to. Right now I'm living the life of my dreams. It's easy to forget that as I'm trying to meet deadlines, or frustrated because I'm feeling overwhelmed, or scared to see that God is directing me to a cliff and telling me to jump.
I know, absolutely know that this is what I was created for. I don't know how it is part of God's plan, but I do know that to create, to be an artist satisfies that desire I've had my whole life. What dreams do you have that you just can't "grow out of"? What desire do you guard and hold on to? What whisperings do you hear? It's the dreams, not the wishes, that are God-given. That will tell you who you are and what you were made for- that reveal your purpose.
Saturday, February 27, 2010
WIP: Blooms Sculpted Wire Lamp
 Been working on a few new things for the etsy shop lately. One of which is this new lamp. The inspiration of this was a pillow I found when flipping through the latest Better Homes and Gardens. They were showing some different bedroom ideas and on one of the beds was a pillow with blooms that looked EXACTLY like my little wire blooms from my photo holders and garden trio's. I'm guessing they were silk screened on.
The image percolated for a few days and then on Thursday I went to my extras bin and pulled out 8 or 9 of these wire blooms that I had made up and stashed previously. To attach them to the lampshade (fanta by IKEA) I used an awl to poke a few holes through the fabric shade along the length of the wire flower. Then using a needle and embroidery floss, I stitched the wire flowers to the shade. Each flower only takes a few stitches to hold it in position. The end result is easy, cute and had that lovely graphic bloom look I love. I've had the shade on a lamp base that was wrapped with wire and sitting in my living room for a few days now. I love it. Although I love big bright and beautiful color, there's just something about black and white that is soooo attractive to me.

I plan on using this as my example and making another to post in the shop in another week. I'd love to know what you all think of it. ;) Should I offer it with the base or separately? What would you do?
BTW- the little scribble bowl beneath the lamp is something else I've been playing with. The acrylic painting is one I did when we got back from Venice in 2003, and the little birdcage to the far right is another idea I've been playing around with. It's base is a collaged plastic lid to a long-gone jar of marshmallow dip. Have a great weekend!!!
Wednesday, February 24, 2010
Tutorial: "love you" Altered Book Photo Frame
 Wondering how to say I "love you" with an old book, wire and a bit of fabric and ribbon? Here's an idea- How about creating this hanging book photo frame?
In Taking Flight, Kelly Rae Roberts had a photo frame project that I took this basic technique of cutting out a rectangle from the front cover from. It's worth checking out her version- it has some lovely wire and tissue wings.
2Tools and Materials
Altered Book Photo Frame
Old Book
Wire words, "love" and "you" of 16-gauge steel wire
Ribbon
Patterned fabric or paper
Embroidery floss
Utility knife
Awl
Needle
Scissors
Glue stick
Craft DrillDirections:
1. Decide whether you want the front of your frame to be the front cover or back cover of your book. Sometimes the front is too distracting and the back cover seems to be the best option. Using an utility knife and a ruler; measure, mark and then cut a rectangle from the front or back of your book. I cut right into the book, no mat needed. Pull out any cut up pages from the interior of the book.

 . Cut ribbon strips and glue around your frame window. Position your wire word "you" beneath the frame window, and then use an awl to poke a few holes through the book cover around the word. Usually one hole on one side of the first letter, a middle letter, and the last letter are enough.
 3. Using a needle and embroidery floss (knotted at end), come up through the first hole, cross over the wire, and then insert the needle back through the same hole. Repeat once more and then move on and stitch down the next letter in the same manner. For the word "love" repeat steps 2 & 3 stitching it to the top of your frame.
 4. Using a craft drill with a 1/16" bit, and drill two holes, one in each of the top two corners of the book. Drill through the entire book block. Open book cover and glue in the patterned fabric or paper in place behind the frame window. At this point some instructions suggest you use matte medium to seal the edges and cover of the book closed. I find that inserting the wire for the hanger wires the book closed very securely- no glue necessary.
 5. Using the 16-gauge steel wire, insert the cut end through the top right hole and then pull through, insert through the hole on the left side of the book and then wrap cut end around wire at the top of the book. Leaving some slack in the wire, cut the wire on the other side and then wrap the end up and around the wire as you did on the left side of the book. Place your photo of choice in the center of the window attaching with glue dots, and then hang on the wall. Enjoy!!!
Tuesday, February 23, 2010
A Find, a Question, and the Mercenary Perspective.
 How fast can I write a blog post? I have 45 minutes until I have to be at my son's preschool to pick him up and a trip to Home Depot to do first. I always fantasize about all the time I'll have to do "me" things while he's a school. It never seems to work out that way.
The Find
Anyways... back to the blog. I found this Basic Grey/Blush for Moda charm pack at my local Archiver's on Sunday. I love both of these companies and in fact used BG's figgy pudding line of fabric for the Christmas ornaments in my book. The Blush series was one of my favorites so I absolutely gasped with delight when I saw this pack. Seriously. I gasped. Out loud. A little embarrassing since not that many people can say they get so effected by an occasion like this but I thought I'd share since the few who do might read this blog and understand. :)
The Question

So here's a sampling of the fabric, my fave is the little patterned doodle flowers and the blue/teal "solid" that makes my heart go pitter pat. When I went to check out I talked briefly to the clerk. I wanted to know WHY a scrapbooking store would be selling Moda charm packs. I've mixed fabric with scrapbooking supplies in my mini art quilts but that still seems outside the Archiver's realm. She mentioned that the fabric could be die cut. That's not anything I'd thought of. Plus, as I thought a bit more I realized what big trend fabric is becoming. Not only have pubs like Sew Somerset been demonstrating the connection for the last year or so, but artist's like Donna Downey have had product lines combining the worlds of scrapbooking and fabric for some time now.
The Mercenary Perspective
Could I dare to hope that the trend was now getting into the retails like Archiver's? If so than it'll do my book tons of good, since it combines fabric, wire and papercrafting in several of the projects. Time will tell I suppose....
BTW- 12 minutes!!!
Ok- 16 after adding photos..... ;)
Saturday, February 20, 2010
Necessary Objects: The Household Organizer gets a Makeover
 Every once in a while someone comments on how organized I am. I feel like I have to instantly disclaim the compliment. I am the most UNORGANIZED person I know. Just the other day my 5 yr-old was in the backseat of the car and commented as if he was making some big discovery, "Mommy, you forget a lot." It's true. I wish he hadn't discovered this truth about me at such a young age, but you can't always choose these things.
I am 35 and my memory is comparable only to a sieve. Recognizing this truth about myself, I've devised ways to help me overcome this shortcoming. The newest is the Household Organizer. Doing a little bit of online searching, I found The Organized Home. It's a website that not only gives ideas for ways to use the Household Notebook (as it's sometimes called,) but also includes all these lovely printables for free! For someone organizationally challenged like myself, lists and planners are an absolute must, and extremely seductive. This site had them all. Freezer and pantry inventory lists, seasonal chore lists, monthly menu planning calendars, and at least a dozen more.
 So Friday, at my MOPs meeting, I shared my new find by using our craft time to cover the binders everyone had brought with a spring patterned fabric. Then we filled them with plastic sleeves, a business card holder, and a couple of photo pages. I've sectioned mine off to include a Family Information section- which will contain important and frequently used phone numbers, the collection of gift cards and business cards I usually misplace, and to-do lists. The next section divider is Kitchen. This section will include the menu planning print outs, shopping lists, a price tracker, and a list of popular family recipes. I can also tuck into sleeves the recipes I tear out from magazines, and then usually find buried in a pile a season later. The photo sleeves hold a few of those recipes I'm constantly pulling out, making them easily accessible. The last section I threw together for the example was a Health section. Here I have my son's immunization records, the prescriptions we've saved until needed, and other medical odds and ends.
 To cover your old binder: Cut a piece of fabric at least 1" wider and taller than your entire cover, then using a UHU glue stick, cover the entire cover with glue. Pay special attention to the edges. Then flip your binder onto the fabric, lying wrong side up, and center it. Then set it down, and press slightly to adhere. Flip over and smooth out the center spine. Working from central spine, smooth out the fabric on either side with hands. Press well on edges to adhere, adding extra glue if needed. Flip the binder over again, so that it is open in front of you and apply glue to both the fabric edge and the edge of the binder. Fold excess fabric over and press to adhere. Fold over corners, creating tucks if desired. Cut a length of grosgrain ribbon and slide under center part of binder as far as it will go. Tie on outside of binder spine. If you'd like to cut fabric to cover the inside of your binder and hide your edges, you can. There you have it: Pretty and Practical!
Wednesday, February 17, 2010
Junk Art- Using Old Trays in New Ways
 Wondering what to do with all those old metal lunch trays you have lying around the house? Ok- so you probably don't have that problem, but I did. L
 ast spring I was at a charity garage/rummage sale my dad runs every year and was about to leave, when my dad tossed me an old tray. He had a stack of them and thought I would want to do something with them. I didn't- they looked pretty hopeless, I mean they weren't even a pretty color, just a rusty old cream.
But I took a couple anyways and when I got home I played around with one of them. My first idea was this memo/magnet board. It turned out kind of cute so I called my dad and asked him to save me the rest of the trays- if they were still there. They were. :) So I got the whole stack.
The memo board came together really quickly and didn't require much in the way of tools or materials either. Some fabric scraps,embroidery floss, a little memo sign, a scissors, glue stick, and my trusty Crop-a-dile were all it took. The Crop-a-dile is my favorite tool ever. It chomped through the tray like butta'. So I went a little crazy and chomped holes on each side of the tray, but then I was able to t
 hread floss through them and give the edge a stitched look. The magnets are buttons stacked and tied together with butcher's twine with a magnet stuck to the back. Easy and cute!
I didn't have the time to get back to the trays until yesterday when I grabbed one and started to play around with an idea I'd had. I wanted to use the tray as a base for a fabric collage. It turned out to be super easy and the result was pretty cute so I thought I'd share it with you. I thought maybe you'd like to make your own. I mean- there's a shortage of inspirational signs made of old lunch trays in the world. Right?
Friday, February 12, 2010
Doodle- Love Valentine's Craft
 A pile of t-shirts, a black sharpie, and a large table top. On Wednesday, between cleaning the house up and a play date, I had the unexpected pleasure of sitting and sketching. My 5 year old's preschool Valentine's Day party was the next day and I'd promised to provide the craft. When I asked my son what he thought we should do, his idea was to have everyone sew hearts to fabric and then hang them on the wall. Super cute idea but I explained that it had to be something that wouldn't require one on one attention from an adult- or band aids. Instead we decided to do t-shirts and instead of sewing the kids would color the hearts.
Except I couldn't stop with just hearts. I had to design owl's with hearts for the girls and then robots holding hearts for the boys. The owl shirts say "Who heart's you?" and the boy's say http:/love/you/: My techie husband thought that wa
 s only kind of clever as it wasn't actual computer lingo- I still think it's cute though.
To make the shirts I did freehand sketches directly on the t-shirts with a sharpie (probably should have used a fabric marker for this). Then the kids colored them in with fabric markers. To make it easier for the kids we had pieces of cardboard that slipped in the shirts and stretched them out quite a lot. I also showed the kids that it was easier to color on fabric if they made marks in one direction and didn't try to scribble back and forth. They did an excellent job. I thought the
 y might get frustrated, but no one seemed to and they all loved the idea that they got to take them home and wear them.
Cost? The t-shirts were a little over a $1 each (Hane's, Target), and I purchased 24 of them. I bought the fabric markers at Michael's and probably spent $28 on those. I bought two of several colors though, anticipating demand for those. So not a super cheap craft (I donated all the supplies) but I think it had a great value and the kids not only enjoyed making them but are excited to wear them as well. The bonus was that I had a great time drawing the designs AND watching the kids as they enjoyed coloring them. They did a great job!
Tuesday, February 9, 2010
Taking a Break
I just typed the words, On Vacation over on my etsy site and thought I'd mention it here as well. I've been sick with a 6 weeks' bout of bronchitis followed by a killer cold. I feel stretched thin but haven't been able to stop myself from working. I've invested a lot of time in my shop and I hate hate hate having to step back. But I'm sick, and my hands are shaking as I write this. Hopefully this break will allow me to rest, recuperate, and let things get back to normal.
Has this ever happened to you? After those college finals? Or in the week's following your wedding? How did you recover? I want so badly to get back to full strength and after a consult with my husband we decided this all needed to go for a while. I hope to start the shop back up in a few week's time and I'll be here every once in a while. Thanks for listening.
Has this ever happened to you? After those college finals? Or in the week's following your wedding? How did you recover? I want so badly to get back to full strength and after a consult with my husband we decided this all needed to go for a while. I hope to start the shop back up in a few week's time and I'll be here every once in a while. Thanks for listening.
Monday, February 8, 2010
Be A River
Feb. 2010- I was paging through some older posts tonight and found this that I did early on and it really had me thinking about how pertinent these thoughts still are to me. So I thought I'd share it again and maybe it'll trigger some pondering in you as well. I'd love to have you share your thoughts on this. :)
If you could be anything in nature what would you be? Would yo u be a tree? A mountain? A small still pond? I was looking at some photos from our vacation last summer. It was a good reminder that spring will come. Looking at this photo of mountains and trees and the river I felt some renewal and a peace.
Then this afternoon I was flipping through old sketchbooks and found this teeny tiny little entry in one from college.It was titled River as Life. I guess it was a personal creed I was thinking about because it goes on..
Meander through life.
Surround yourself with nature.
Be a source of life for all that surrounds you.
Be constantly moving and changing- sometimes slowly, sometimes in a torrent.
Be a still small creek that yet carves its own way through mountains.
I would add to that to be patient when life moves so slowly and enjoy the almost stillness. You're gathering strength for the rapids to come.
If you could be anything in nature what would you be? Would yo
 u be a tree? A mountain? A small still pond? I was looking at some photos from our vacation last summer. It was a good reminder that spring will come. Looking at this photo of mountains and trees and the river I felt some renewal and a peace.
Then this afternoon I was flipping through old sketchbooks and found this teeny tiny little entry in one from college.It was titled River as Life. I guess it was a personal creed I was thinking about because it goes on..
Meander through life.
Surround yourself with nature.
Be a source of life for all that surrounds you.
Be constantly moving and changing- sometimes slowly, sometimes in a torrent.
Be a still small creek that yet carves its own way through mountains.
I would add to that to be patient when life moves so slowly and enjoy the almost stillness. You're gathering strength for the rapids to come.
Friday, February 5, 2010
Publishing Opportunities- Upcoming Submission Deadlines
Here a few of the magazines with upcoming deadlines. To read more about the specific challenges and descriptions of the individual publications click here. Take a look and maybe you'll feel inspired!
March 15th
Greencraft, Art Doll Quarterly's metal challenge, and Somerset Home.
April 15th
Somerset Holiday's and Celebrations, Somerset Digital Studio, Belle Armoire Jewelry and Somerset Studios' Halloween Challenge.
Cloth Paper Scissors will be publishing a special "gifts" magazine before the holidays. The deadline for this is April 2nd. Otherwise it looks like they accept art and articles on an ongoing basis.
If you're interested I posted some ideas and tips for submitting to an art magazine here.
Thursday, February 4, 2010
Scribble Heart Giveaway!!!!
Hey all- A quickie post to mention that I am currently participating in a give-away over on Liv Lane's fabulous blog, Choosing Beauty. I love that her blog is all about the beauty in our lives- both within us and without. So head on over, enjoy her blog, and leave a comment by this Friday. You could be the lucky winner!!!
![[020310+Scribble+Heart.jpg]](https://blogger.googleusercontent.com/img/b/R29vZ2xl/AVvXsEiMAflKtOhZsoIc1ejMRgNlSDD1bVEF19HGAiV2BOTaaI63WepQ1SsWem3enuezaNaKbt2hLMLFmVCl_sCu0uBQS-EzUDs9Ohqf7FNrvegONmdobRYGZgQccYLlf-HQCbElY01tnFEXlCs/s1600/020310+Scribble+Heart.jpg)
Wednesday, February 3, 2010
If at first you don't succeed...
Yay! I just received a notification that my submission for the June issue of Sew Somerset was accepted! Super excited to have this opportunity. And it feels doubly nice since I didn't make it in last time. I guess try, try again really does pay off!
Tuesday, February 2, 2010
Inspired Reads: Layered, tattered, & STITCHED
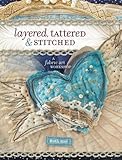
The techniques are innovative and varied. The 20 + projects run the gamut from art-to-wear pieces to wall art to functional art in the form of photo frames and gift wraps. They vary in length and expertise level as well(I don't use a sewing machine, I hand stitch and am confident that I could achieve similar results). The result is a book that has something for any skill level.
This is a mixed media book, although the tie together is fabric. Ruth demonstrates how to use resin to coat fabric in one project, in another she stamps on plexi, in a few she combines fabric with wire accents; something sure to capture my attention! I also enjoyed the variety of fabric dying techniques and of course her techniques for singeing, tattering, and otherwise distressing fabric to create multi layered stitched works of art.
An amazingly talented jewelry artist (check out her first book, A Charming Exchange, written with Kelly Snelling) Ruth pulls in her love of beads, metal, and wire and combines them with her fabric techniques, to create dimensional art.
Technique-rich and beautiful to look at this book is the perfect example of what I find valuable in a craft book. I'm looking forward to trying all the techniques and experimenting with them, combining them with my own techniques and enriching my work. As I do, I'll let you know how it goes, and if YOU have tried any of the techniques in Ruth's book I'd love to know what you thought of them and how you integrated them into your art.
If you haven't checked this book out yet, I would definitely encourage you to do so! For more information about Ruth's work visit her blog, Let the beauty we love be what we do.
A quick disclaimer- I was not contacted, or asked to do this review. I just really love the book and want to help promote really great books. The publisher of Ruth's book, North Light is my publisher as well but that had no influence on me or this review. Enjoy!
Monday, February 1, 2010
Adding Categories and Making Changes to Art as Usual!
Maybe you noticed, maybe not, but the blog now has 3 columns and YES I did it myself. Awfully proud of that. I'm in the running for most horribly technologically illiterate person in my age group. Usually I rely on my husband, a software engineer, to take care of these things for me, but he's been busy and so I decided to take some things on myself. Per a request I've also added tags to my past posts to help with the whole searchability thing. As well as a few different ways to do these searches. Adding these tools started to make the right column seem awfully packed- which led me to the quest for 3 columns.
I've also worked out a list of categories that I'd like to create posts for regularly. One is Local Craftiness which will not only include any of my local classes and fun local finds but will also highlight the local craft fairs, artists, brick and mortar boutiques and indie craft suppliers in the area.
Another category will be titled Inspired Reads and I'm planning on introducing you to some of my favorite art and craft authors and their books. I'm huge craft book-aholic and always have several checked out from the library and laying around the house. I'd love to highlight some of my favorites as well as the techniques within them. I'm hoping to integrate some author interviews a little later down the road as well.
Additional categories would be Tutorials, and Art Everyday in which I plan to include inspirational ideas for living art everyday, in your home, and in our world.
I chose the title Art as Usual a year ago because it states in three little words my personal Artist's manifesto. I need art to be an everyday, all the time, integrated, take-it-for-granted part of my life. This blog helps me to live this and I want it to help you to live it as well.
So here, in my little corner of the blogging world, I plan on encouraging you. Through experiments, through tutorials, by providing information and inspiration so that you too can make a life with art, your everyday usual.
Subscribe to:
Posts (Atom)