Monday, May 31, 2010

The Old Shop Teacher and my Mom

So each year when garage sale season starts my dad starts to come home with all these little knick-knacks and bits of things. "Can you use this?" Or "I thought you could use this-" are phrases I began to hear a lot of. The thing is that although I couldn't use them all he finds some really cool stuff. After he'd come home with a stash of skeleton keys, a ton of buttons, some really fabulous old wooden things, old bottles, etc. etc. I told him to open a vintage shop on Etsy. He thought about it a bit and recently we set up a shop for him, The Old Shop Teacher.

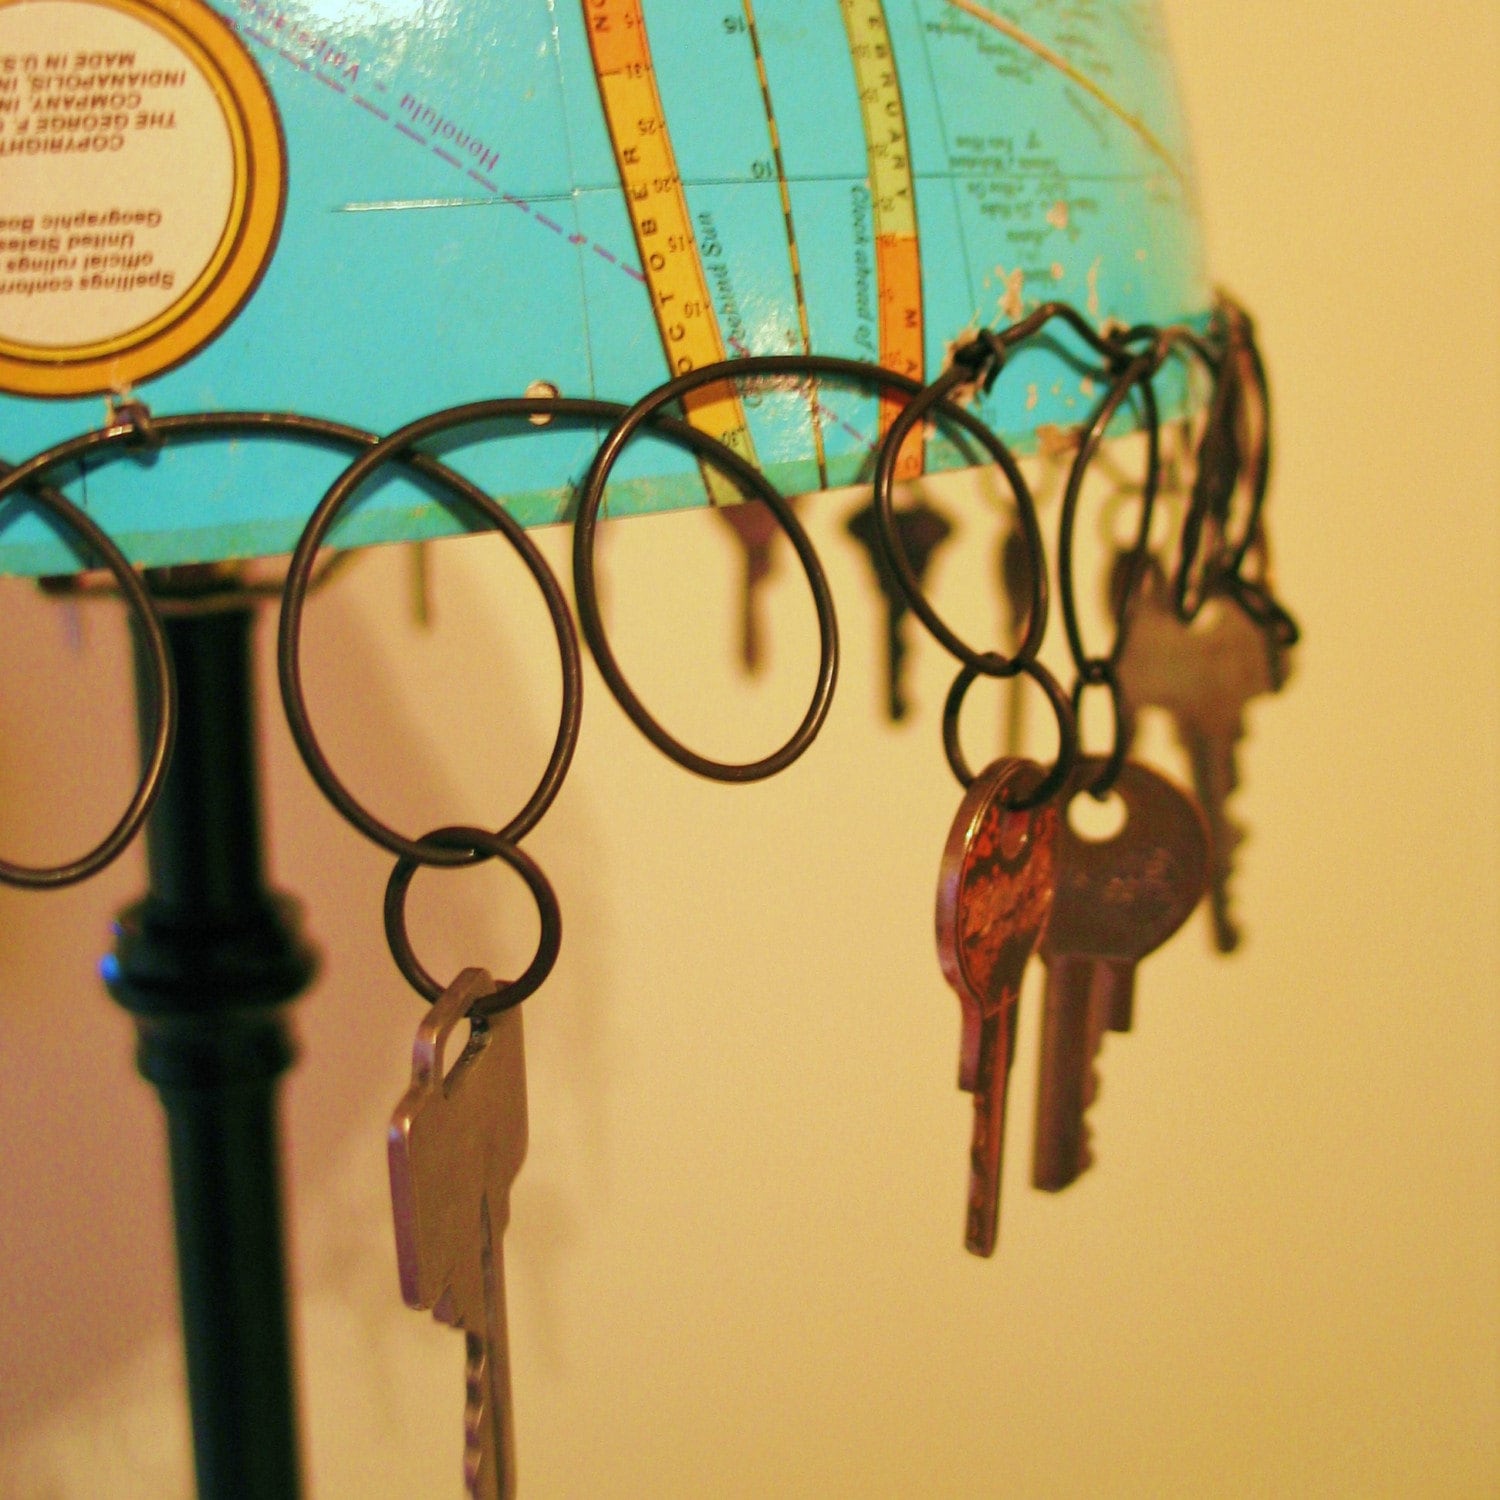
But what really makes it a great shop is that my mom is adding some of her art made from vintage items to it. Years ago she made an amazing lamp for the spare bedroom we sleep in when we visit. It's made of half of an old globe. I love it! She recently made a couple of more and has offered them for sale in the shop. And there's nothing else like it on Etsy- it's truly an original.

She's also been crafting these fabulous clipboards from a stash of vintage one's used in the high school my dad teaches at. They have a beautiful patina from years of use and I love that she doesn't over do it with the decorations/ribbons so that you can still see the old metal clip. I particularly love the one at left. She used paper from October Afternoon that has a map of MN on it. Then added a little red car traveling up 35W which is the road to Minnesota's North Shore- one of our favorite vacation destinations when we were kids. Although these work great as clipboards, I love seeing them displayed as photo frames.

My parents are both teachers and soon to be done with school for the summer so expect some more amazing finds and fabulous vintage creations soon!!!

Sunday, May 30, 2010

Take the Time to Consult Your Map


Sometimes it feels like my creative journey is leading me down one way streets- in the wrong direction. I can tell you that's what it felt like because as a child I had a pretty impressionable experience with that. Driving along we took a turn and went down a street and as we went, noticed that people in the skyways, and on the side of the road were waving at us and seemed really focused on us. This is downtown Minneapolis and while friendlier than most, you don't usually see people waving and cheering for you as you drive down the street. The street was Nicollet Ave.-Nicollet Mall, and is reserved for public transportation and emergency vehicles. Not only were driving our car down a "do not enter" street but I believe it was the wrong direction as well. Because of the "strange" behavior of the pedestrians we looked around and soon understood the situation. To fix it all we had to do was turn off, but the experience is still one I remember.

This story comes to mind today because today I started Kelly Rae Roberts' business e-course. She had a wonderfully inspirational first post with prompts at the end that have made me think about my creative journey. There have been times when I felt in tune to the journey, and other times where I feel as if something's not quite right but can't put my finger on it. I'll be cruising right along, feeling the creative energy, whipping out art like there's no tomorrow and more ideas than I have time to do. Then suddenly- it stops. I can't finish a piece to save my soul, because the vision isn't as clear, and nothing I try seems right. I feel clumsy and my entire life is affected. I can't seem to concentrate on the easy things-like what's for dinner. I feel anxiety when I enter the studio. I see the projects stacked up and feel like the current that I was happily following suddenly switched directions and I was now struggling upstream.

That's been the case lately and I've wondered how to express it to you. If I should. But after today's first class I think I've realized that this is all part of the journey. We all go through it to one degree or another. I think it's important to realize because if you don't acknowledge it as part of the journey than fear comes knocking and soon after it's arrival creative paralysis sets in.

If this happens to you, then I think taking it slow and looking around at your life, consulting your map, or a roadside sign or two might be the answer. You might even stop to talk to a pedestrian. Everyone on that street saw us going the wrong way down a "do not enter" street. If we had rolled down our windows and asked anybody what the commotion was about they would have told us. So do the equivalent. Ask a friend what they've observed. Or ask yourself why do I feel this way? Was I going the wrong direction to begin with? Was I inadvertently traveling along to someplace I don't want to go? Or is there something else going on? I feel distracted so I need to ask myself where the distraction is.

After looking at my life I've realized that my creative life might be stalled right now because I'm dealing with some pretty big life changes in other areas of my life. Letting myself put a bit more time into those areas right now is really investing in all areas. My creative growth will resume, but I'm going to let myself take it a little easier this next week. Not give in to my internal pressure to produce. Play a little. I'll let you know how it goes... :)

Friday, May 28, 2010

Tutorial: From T-shirt to Tooth Pillow

A few months ago it started to wiggle, it's now officially progressed to a wobble and I daresay within the next couple of weeks my son's first baby tooth will be gone. To prepare for the momentous occasion Jasper's been trying to make a list of things he thinks the tooth fairy should bring him. I keep telling him it's not like at Christmas with Santa. The tooth fairy doesn't have a big sack full of toys it lugs around or millions of miniature elves to craft them for it. But we keep having these conversations. So I decided to make a tooth pillow with a very small pocket so he can see visually that only something small would fit. Definitely not something Star Wars toy-sized.

To make the pillow we worked with what we had- a too small t-shirt left over from the Doodle- Love Valentine's Day craft project. My sewing machine is out of commission at the moment so I stitched it all by hand. All told though I think the entire pillow, including applique and embroidery took less than an hour. Happy Creating!
-----------------------------------------------------------------------------

Tutorial: Tooth Fairy Pillow

Tools and Materials
White t-shirt - small short sleeved
White embroidery floss
Red fabric scrap
Red embroidery floss
Black embroidery floss
Fine tip Black Sharpie or fabric marker
Needle
Scissors
Stuffing

Step One: Cutting through two layers of fabric (front and back of t-shirt) cut out right half of a tooth shape. I cut it freehand, however you could sketch out a pattern on paper first. Fold over to the left and use it as a guide to cut out the second (left) half of the tooth. You have a somewhat symmetrical shape.


Step Two: Trim up the shape with your scissors, it doesn't have to be perfect. I actually trimmed mine a little irregular because I didn't like how perfectly symmetrical it looked. The shape looks big but remember you'll be stuffing it later which will puff it out and narrow it a bit.


Step Three: The smart thing would be to do your embellishing at this point, before you stitch your two pillow pieces together. However, I was figuring this out on the fly so I stitched my two pieces together at this point by doing a straight stitch, using the white embroidery floss, leaving about a 1/4" edge allowance. Leave a 3-4" gap to insert stuffing through.


Step Four: Insert stuffing through the gap you left unstitched. Use the eraser tip of a pencil to get it into the tips of the tooth if necessary. When the pillow is the desired thickness and density then straight stitch opening closed.


Step Five: Cut the sleeve off of your short-sleeved white t-shirt and flip it so that the under seam is showing and cut it into the desired pocket shape. Flipping it is a decorative thing. I liked the look of the seam stitching. Using black embroidery floss, stitch it to your pillow with a running stitch.


Step Six: Cut out an arrow from your red fabric and using red embroidery floss,and a running stitch, stitch to your pillow.


Step Seven: Using black floss or your black fabric marker or sharpie add the words "look" and "here". I did the "look" with the floss and the "here" with the marker to give an idea of what they would both look like. Any embellishing is of course optional. My son suggested we add it so that the tooth fairy would know which of his pillows it should look in. I think it ended up looking kind of cool. :)

Thursday, May 27, 2010

Designs that Dangle


Roulette Toss Paper Clip Chandelier by ReDesign Technologies
Saw these over at Handmade Spark today and I fell in love. They're elegant, cast beautiful shadows, and get this- they're made out of PAPERCLIPS!!! Yet another example that something amazing can be made of anything. To see more check out ReDesign Technologies on Etsy.

http://www.stringgardens.com/files/gimgs/1_76392.jpg
String Garden
Then over at Poppytalk's blog I saw photos of these amazing string gardens. They're perfect. There's a strong tradition of living sculpture in European floral design that I was fortunate enough to be exposed to several years ago in a European floral design class. These photos remind me of some of the environmental sculptures I saw there. Living art, these hanging string plantings by Fedor are simple, statement making, and let me see the entire plant in a beautiful way- as God's art.


Curious, I did a little searching on Etsy for more examples of hanging art and ran into this gorgeous mobile made of circles cut from basic grey paper by paperNplastic's shop. Everything about this attracts me. The butterfly look of it, the bamboo handle with the fairy flower at the top, I love it.
Makes me want to give mobiles a try....how about you?


Wednesday, May 26, 2010

What to Do with an Old Metal Wreath Form

Last week I went to a HUGE sale for charity that my dad organizes each year. I came home with one box full of tin lids- just tin lids. They were going to crush them down and toss them at the end of the sale so I "rescued" what I could from this terrible terrible fate. Then there were the books. Three huge tables of paperbacks, encyclopedias, cookbooks, self help books, you name it. I grabbed the most vintage-y looking of them. Then as I was getting ready to go I saw a pile of metal wreath forms. Metal of any sort attracts me and although I couldn't think of anything to do with them I knew I needed (ok wanted) one to play with.

Yesterday as I was unpacking all the sale things I brought home I pulled out that wreath form and started to think about it.

What could you do with a metal form? You could turn it into a hanging candle chandelier, you could wrap it with lights and suspend it, you could wrap it with fabric or moss. You could use it like stretcher bars and stitch canvas to it to make funky framed art.... Or you could go with the obvious and use it as a wreath form. I really wanted to see what I could do with it that would add to it yet not take away from the shabby chic charm of it. So here's what I came up with.

A couple of stitched branches, a bird, and some ribbon. Not much and maybe I didn't even need the flower but it covered up the wires attaching it all.... So there's answer no. 1 to the question of What to do with a metal wreath form. Now I'd like to get my hands on a few more and try some of those other ideas out.... Know of any good garage sales coming up??? ;)

Tuesday, May 25, 2010

Influences: Sculptor Alexander Calder

Calder in his Paris studio, 14 Rue de la Colonie, fall 1931. Photograph by Marc Vaux
At the local library I stumbled upon a children's book about Alexander Calder and it brought it all back. The fascination I felt when I first saw his wire work and a video of his Circus. When I saw it at my local museum I had that feeling of gratitude you feel after having experienced something wonderful. I feel that when I'm hiking through a forest, or traveling with my husband. Just so grateful to have had the experience and the knowledge that your life was changed for the better because of it. For those who haven't seen a video of Calder's Cirque I've included it below. It's just charming.


Untitled, 1938
Wood, wire, sheet mtal, string, and paint
81" x 96"
Private Collection
A12975
Alexander Calder is also the creator of mobiles. They are instantly recognizable and so so beautiful. Like watching a cloud drift across the sky.
What artists have influenced you? I'd love to know so please leave a comment!


Monday, May 24, 2010

Creative Bloom: Book Update

Just a quickie update to let you all know where the book is at in it's development. A couple of weeks ago they were taking the beauty shots and then last week it was at design all week. The fabulous designers at North Light are working their magic and I couldn't be more pleased!!! So exciting to have so many talented people adding their abilities to making the book the best it can be.

Publication date is November. Thanks again for all your well wishes with this project!!! I am sooooooo excited to show it to all of you!!!!!

Sunday, May 23, 2010

How not to appear Crazy Obsessed with your Art and Etsy-


Before you check out the How Not to Appear Crazy Obsessed tips below take a moment to read the description that follows and see if it fits you.

Are you obsessed? Is there a subject that you have to mentally tell yourself to calm down and don't go on about or else potentially lose whoever you're chatting with? For me, it's always been art, and in the last few years that generalized "art" has morphed to include my etsy shop, my blog, my wire and fabric art, my magazine submissions, and my BOOK! Very cool but I'm afraid it's made me completely unintelligible to a goodly amount of the people I meet. When you have to back up a conversation and spell "etsy" (it's betsy without the "b"), or replace the name of the magazines you love with the more non-descript "art magazines", or start referencing your own blog posts in conversations... well, it's easy to see that your world has narrowed slightly in it's focus.

If I didn't care about how I come off to others than none of this would matter. But I do. It's not nice. When we're focused and engrossed so exclusively on our own interests we lose that ability to make small talk and relate well with others. SO it is important to give time to all your interests, like I'm interested in cooking, decorating, travel, motherhood, books, and of course, my kid. If you don't remember what those interests are then do a little brainstorming. :)


Here's Some More Tips for Appearing Well-Rounded and not Crazy Obsessed:

1. Limit how often you allow yourself to say "Etsy" in a conversation. I think twice is nice.
2. Always ask about something the other person has been doing or common interests you have.
3. Vary your media inputs. By this I mean toss in an hour of public radio into your self imposed diet of crafty podcasts while working.
4. Follow a blog or two about something other than art. Again, reference your list of other interests.
5.Don't ramble without a preamble. If someone in the course of a conversation asks about your shop, or your art, then don't go off and spend the next 10 minutes monopolizing the conversation. Odds are they were just looking for a "it's good". If after the "good" they inquire further you can take that as a sign of actual interest and then it's ok to let them in a little on the latest.
6. Find others like you. If you have friends who are just as crazy obsessed as you are then you can all chat about an obscure thread in the Etsy forums and no one will feel left out. They'll actually thank you for sharing valuable information. Spending time online or chatting with these friends helps you spill out your thoughts and allows you to then greet your husband with a "how was your day honey?" instead of the "YOU WON'T BELIEVE what I saw on Etsy today." Good for your marriage- good for you.

Thanks for reading and if you have any tips to share- please do!!! We could all use the help!


Friday, May 21, 2010

Transitioning

Today's the last meeting of a group I joined 4 and 1/2 years ago. It's Mothers of Preschoolers and I have now "graduated" out. Crazy to think my little boy will be going to Kindergarten in the fall. Crazy to think he'll be in school full time. Crazy to think I'll have all that time alone.... and free. Bet you can guess where I'm going with this one. :)

Life is going to change dramatically again next fall. My little boy will be a schoolboy and I'll be home with only a book to market, art to do, and an Etsy shop and blog to work on.  Plus all the errands, house stuff, mom stuff, and other commitments. All the things I've been trying to cram into my 2 1/2 hours Mon- Thurs. that he's been in Pre-school will now be spread through the 7 hour school day. It also means no cutie to eat lunch with though, and about that I'm fairly sad. So this summer we'll make the most of our time with impromptu picnics, trips with friends, to visit family and enjoying time together. It's a nice transition. 

So here's to summer!

Thursday, May 20, 2010

Eight Tips about Creating

1. Always follow the little detours and meanders whenever you can- they usually bring you somewhere you were meant to go that probably wasn't on your map.

2.Be generous with your art and knowledge. Creating an environment of shared discovery is so much better than living in a artist vs. artist world. Inspiration will never run dry. Sharing with someone else might trigger your best idea ever!

3.Know that if you've had an idea that others might have had the same idea, but don't give up on the idea because you will make it unique- just because your experiences, skills, and YOU are different.

4. Have faith in yourself. Just because it seems no one else is doing what you do doesn't mean it's not any good. Many people have ideas that don't act on them because they don't have faith in the idea and let it go. If you feel something has potential or interests you than act on it! Make it happen, you might just be the first!!!

5.Create wherever you can. If you can't-you might be working, or diapering, or doing life stuff, then make sure you write down whatever images or ideas come to you, so that you can create with them later.

6.NEVER assume that you can come back to something, or that you'll remember something for later. Inspiration is fleeting. It comes and goes whenever it likes and you can't control it's schedule. AGAIN, write or sketch it out!

7. Create because you LOVE to, create because you HAVE to. It's who you are, and a necessary part of your life as a creator. Don't judge the product, because just having done something, anything, was time spent doing what your were meant to do. Being who you were meant to be.

8. Art is a gift- so don't forget to thank the Giver!

Wednesday, May 19, 2010

Tutorial: Hand Stamped Tin Embellishments

I'm all about embellishing to add that extra special "wow" to my mixed media works. To do that I turn to metal and, of course, fabric.

Today's embellishment idea is to reuse metal sheeting or tin to create easy, but sensational, additions to your collages or assemblages. When I say simple and easy I mean simple and e-a-s-y. Seriously. :)


So give it a look and then give it a try!
--------------------------------------------------------------------------------------------------

Tutorial: Hand Stamped Tin Embellishments

Materials and Tools
Tin or Sheet Metal
Steel Block (not pictured)
Hammer
Metal Letter Stamp Set
Tonic Scissors, or Tin Snips
Wet Dry Sandpaper or Metal File
Crop-a-dile (optional)
Embroidery needle and floss (optional)

Step One: Cut out your shape with the Tonic Scissors or tin snips. If the metal is soft enough you can use an old scissors. Be sure to either file or sand your sharp edges smooth. Gently round off any sharp corners.

Step Two: Put your steel block on the floor or other hard surface. Then select your letter and make sure that it is facing the correct direction, then place it where you want and holding it firmly in place, strike straight down on it with your hammer. The hammer in my photo is facing the wrong direction because my five year old is actually manning the hammer while I hold the letter stamp. Continue with each letter of your word.


Step Three: You may wish to glue your embellishment to your piece but we decided to stitch ours on. To add holes in the tin I reached for my handy dandy crop-a-dile. In fact, I held the tin heart over the leather I was going to back the piece with and cut a hole through them both simultaneously. The leather scrap was actually a swatch from IKEA of the fabric of the leather sectional I'd like for our downstairs. Easy and quick!!!

Step Four: Then using embroidery floss and a needle, we stitched the leather and tin heart to our canvas. Done!

Monday, May 17, 2010

Ooh.... Guess Who's Today's Business Spark? Single Stone Studios!!

So I'm loving that when I opened today's handmade spark e-newsletter I found one of my favorite etsy shops ever- owned by one of my favorite people ever!

Shelley's told me the story of how Single Stone started before and it's truly one of the most inspiring stories I've heard. Shelley shares it with the handmade spark readers in this article.

So please click the link and CHECK IT OUT!!! Yay Shelley!!!

Look What Found Me- Etsy's New Suggested Shops Feature

Perhaps you've noticed, perhaps not, but if you check out your favorites on Etsy you'll notice you now have a tab that says "suggested shops". Etsy generates them based on your previous chosen favorites. I was curious to see how much of these shops I'd a)heard of and b)had things I liked. I did recognize a few of the shops but with 200 to choose from many were new to me. As for the liking things, I think I spent a good hour paging through and looking at all the lovely lovely suggestions. But there were a lot that I glossed over, so it was all in all pretty hit or miss. Still, it's a great way to find some new shops.

Here are a few of the things I found:

Ranunculus Freeform Beaded Necklace
Bib necklaces and fiber are a combination I'm completely loving right now. How amazing is this necklace with just a simple black dress? This comes from a shop that was new to me, Irregular Expressions, but I am now completely in love with. Their entire inventory is not to be believed beautiful.

Tree Silhouette Leather Cuff


Another shop that caught my eye was Holly Hawk's, I love this leather cuff. The trees are beautifully done and I think I could wear this with anything I own.


Feathered Friends Art Print

Love this print of an original painting by Blenda Studios on Etsy. I think it's the bright/dark contrast that I'm really enjoying!


Sisters at Heart- Embroidered Mixed Media


After a bit more browsing I found this bit of art by Mary's Granddaughter
which I really like. It makes me think of a good friend.

Looking at the selections I'd say Etsy thinks I like fiber, jewelry, birds, and mixed media. I can live with that.:)

So check out the new feature and see what your suggested shops might reveal to (or about) you!

Sunday, May 16, 2010

A Challenge to Create!

Cloth Paper Scissors is having a contest titled Artisan Search 2011. No, my five year old isn't entering, but I think he's got a pretty good shot in another 15 years don't you? He made this collage for my mom for her birthday. I tried to convince him to give it to me... but it went home with grandma the other night.

Back to the contest details: They have five categories, Mixed Media stitch,Collage and Assemblage, Art journals and Bookmaking , Printmaking and Silk Screening, and Mixed Media Jewelry. Entries are to be received by September 13th in the form of digital photos. You can submit three works of art per category, and enter multiple categories. However, you would only be selected as a semi-finalists in one of the category submissions. There will be five semi-finalists per category. There's more to the contest information, you can see it here. But I got to thinking about this. I can think, off the top of my head, several of you who I think should enter.

Again, what do you have to lose? AND even better- what do you have to gain? Your work would garner national attention, you could tell your friends and family (they might be impressed-but maybe not), but best of all, you'll have made three works of art minimum that you might not have had the impetus to create before and they could be your most favorite pieces ever. PLUS it might be just the challenge you need to bring your art to a new level. Just something to think about....

Saturday, May 15, 2010

How do you Mark Time?

Today I turn 36. It's a little hard. That just seems so much older than 35. Although my brother informed me last year that the insurance companies will always round up five years at 35 so statistically I'm 40 already. Brothers are great for that aren't they? :) So on the most part I came to grips with the almost 40 thing last year and really today I'm just glad to be who I am, where I am, with the people I love.Talk to me again when I'm 39 though, and I might have a different story for you.

But having done the birthday thing for *almost* four decades now :) I've come up with my own favorite way to celebrate. I buy art supplies, splurge on a big canvas (it always helps that today falls during Dick Blick's 60% off canvas sale) and I paint. I go look at art or spend time in nature, I spend time with family, and time alone and try something new.
The idea is that each year's painting becomes a gift I give myself to mark the
occasion. I haven't done it that many years but really enjoy spending the day this way. It's the painting time that really seems special, I don't do it often. Painting is personal, more than any other art discipline I believe because it bypasses the mind and my heart and hand connect. I enjoy printmaking, mixed media, and sculpture immensely because they do engage my mind as well as my heart. But painting.... painting is different.
I don't have many paintings in my house but those I have, I love. So today I thought I'd give you a little tour of my personal collection.

The waterfall paintings were done in my mid-twenties- after a trip to Yosemite Falls. The flower pot painting to the left was last year's birthday painting. The little painting/pastel work at the top is a view of the pond near my parent's. It was one of the first things I did that I liked after I came back to my art 4 years ago. The painting of Venice is from 2003. It was my after the fact souvenir of the trip. The water in the canal was almost an aqua, it was so beautiful. Each has a meaning and each is special because it marks a time in my life.


So that's the end of a brief tour of my favorite paintings. If you stick around, maybe next year I'll give you a tour of
my prints or sculptures. ;)

Friday, May 14, 2010

Decorating with Kraft Paper and Pineapples!


From This...


To THIS


All I can say is it's AMAZING what a big roll of kraft paper can do. Here's some photos of an event I helped decorate for. It ended up looking pretty fabulous so I thought I'd share some of the photos with you!

The zebra striped paper became table runners, and the great big giant leaves we painted became the jungle surroundings for a very special Night From Africa event. The event was to raise awareness of the situation in Kinyago-Dandora area of Kenya.This is a slum area just outside of Nairobi that has become the trash dumping area for that entire city. Kenya Children's Fund supports two schools there, a primary and a secondary. They teach them about Christ while ministering to them with the basic necessities: food, medical attention, and an education. This brings hope to both children and their parents and they truly are a light in the darkness that is that area.

Check out the authentic African food- stews, rice, bread, dips, a carrot salad of some sort, and chicken pie. It was all delicious! There were visitors from Kenya with us and they LOVED the food. I was a little hesitant (just because I'm not the most adventurous eater) but it was all really yummy!

After the dinner we went upstairs to the church sanctuary for a program. There was live music, a heart wrenching dvd, and some wonderful testimonies to what the school is doing in that community.

To get involved, check out the Kenya Children's Fund website, they have opportunities for any level of involvement or support!!! Then become a fan on their facebook page too!

Wednesday, May 12, 2010

Something to Tempt You: Summer's Online Classes

What to do with the summer? If you're a mom you've probably already lined up VBS, a sports camp or two, a trip to the lake, family vacations, and maybe some playdates. All for your child. What about you? What are you going to do that's enjoyable this summer?

What about enrolling in an online art class? I've found a few that look really amazing and promise to challenge and grow you as an artist. Take a look-
@ home with Claudine Hellmuth
The description for this reads:
This 12-week class allows you inside access into artist Claudine Hellmuth's in home studio. Claudine will provide inspiration and a lifetime's supply of mixed-media techniques to incorporate in your scrapbooking layouts, journals and mixed media projects. The techniques you learn will build on each other and culminate in artistic projects, including: art, home décor, fashion and of course scrapbooking!
Class runs from July 1st to September 22nd and cost is $79.

BWS tips button
Flying Lessons: an e-course from Kelly Rae Roberts
Here's a brief part of the class description:
"What I’ve learned in the last few years is that we can propel ourselves into living our dreams with successful creative businesses with two must haves: inspiration + tips. And that’s exactly what Flying Lessons is all about. Inspiration comes from sharing the stories of our creative journeys so that we can begin to dismantle all the misconceptions of what the creative life looks like. It means getting our hearts engaged in the business side of what we do. It means connecting to, and acknowledging, all the layers of our creative lives – our joys, successes, and downfalls."- Kelly Rae For the full description click, here.
Class starts on May 30th and runs for 5 weeks. Cost is $100.
PS: I think this is the one I'm going to spend my birthday money on. ;)

Online Classes by Alisa Burke
Alisa Burke, author of Canvas Remix, has workshops available online at any time so you don't even have to try to fit them into your schedule.
She offers classes titled Graffitti Chic, Anti-Scrapbook, Whimsical Women, and Recycling Remix. They usually run for about 5 weeks and cost about $50. To view info on her classes click, here.


Mixed Media Artist Cristina Zinnia Galliher has a selection of fabulous looking online workshops as well. Titles like Altered Bottles, Altered Tiles, Shrines... and the art she demo's is sure to get your creative juices flowing. These workshops are ongoing as well and costs range between $45 and $60. Be sure to check them out!!!