Friday, March 1, 2019

Come See Me at Well Crafted Studio!

You are cordially invited to come visit me at my new endeavor, WellCraftedStudio.com!

I can't wait to see you there!


Thursday, January 3, 2019

Coming Soon! The Next Adventure Includes YOU!

So it's true. This is the first blog post I've written since 2014. It's a crazy kind of homecoming. And the way it came about is bittersweet. I jumped online this morning to essentially cut and paste this life. Post by post I started to take it apart. And in the doing I relived a lot of who I was at that time. I actually started to blog in 2009.  Ten years ago.

Unexpectedly, it was cool to meet the me from back then again. I was a lot more inspirational in the posts than I remember being in life. For instance, what I remember is being exhausted a lot, and writing from a place of desperation. Every mom of a 4 year old can relate,  it's so easy to lose who you are in what you do all day. I wrote so I could keep the part of me that was creative and an artist alive. I wrote because I needed art friends to connect with as much as I needed mom friends.

So life was a lot different in 2009. And I like seeing who I was, and I'm happy to be picking up where she left off. It feels a lot like a do over, a lot like a continuation, a lot like coming full circle.

Because here I am again, ten years later, and I'm starting a blog. It's going to be an amazing place with videos, inspiration, techniques, and encouragement. I'm seriously excited. Which is interesting, because it was a year ago when I realized that God had placed this in my heart and I'll admit to telling him  then, "I can't. I'm too tired. It's too much and too big." and I basically ran. Hard and far.
But that was a year ago and in a year a lot has changed. I can honestly tell you now that I am completely thrilled to say,

"Well Crafted Studio is coming soon."

I hope you'll join me because the best part of revisiting this blog? It's been reading the comments you all wrote. February 1st, we launch wellcraftedstudio.com. It will be amazing if you could come. My hope is that the new site will be a place you can visit with a cup of coffee in hand, and together we'll play. We'll make stuff, try stuff, probably fail at a few things. But we'll do it together with tutorials, videos, interviews with some amazing creatives, and lots and lots of crafty joy. It will be place you can draw from for inspiration and will encourage you to fully live the life you were created for. It will be community. I can't wait to have you visit.

PS- leave a comment and tell me what you'd like to see at the new site and what you've been doing. It would be awesome to catch up!

Wednesday, January 1, 2014

Enjoying the View

Enjoying the View
There's something about turning the page on the calender year that naturally gets us reflecting and today I hopped on and I started looking at my blog again. It's been a while. And after looking at some past posts I kind of want to update you on who and where I am today. To begin, I had on my profile that I'm the mom of a 7 year old boy- I changed it to 9 cause he's almost that age. Wow! I think I began this blog when he was 5 or 6. I can now add Artistic Director at Art 2 Heart ( a christian non profit creative arts ministry) to my list of "wife, mom, and artist". I started with A2H as a volunteer artist about 3 years ago and remember thinking "this could be a full time job for someone". It's basically turned into a full time job for me. I hesitated to say that for quite a while, cause I don't get paid. But my husband called it like it was last summer and it really pretty much is. I get to be an artist, I get to encourage others to develop and appreciate their own creativity, I get to help others with my product designs. It's all pretty darn cool. And all a total gift from God. Cause only He gives gifts this good.
I also get to work with the best people. Which is a huge switch from when I started to blog. Back then I was on my own a lot, with only a couple of kindred hearts I met via etsy to companion with through email. Being part of Art 2 Heart has meant joining a team of like minded women and I'm thrilled to have their support and encouragement on a daily basis. That's a pretty huge shift. And as my involvement with Art 2 Heart has grown, I've done less publishing but I still try to meet the Sew Somerset and Somerset Home deadlines-because that's where I started and it's something I do out of a sense of gratitude almost. Also, I often see God using the art I publish, later on as a product design. I also create and sell my own work at Art 2 Heart. I still see the wire/fabric sculpture and mixed media as my art but really enjoy sewing with my machine, crafting, and doing all the other fun new things I get to do.
Let's see... other things that have changed. I'm a redhead now. I'm also completely obsessed with torch fire enameling. I'm also on year 3 or 4 with the whole gluten/dairy/sugar free thing. Although to be honest I've been sneaking sugar coffees for the last couple of months and the holidays were not anything to brag about..but I'm going straight soon-honest and for true!!! I love my kid, and my husband even more then I did- oh and I'm turning 40 this May. That's crazy. I have not had my etsy shop open for a couple years now. I took a break when I began really committing more and more time to Art 2 Heart and I just haven't gotten around to opening it again. I toy with the idea every once in a while but to be honest this blog is a higher priority to me. So if I was to take anything back on it would probably be to post more here. Cause I miss you guys. You've been awesome when I needed awesome and I appreciate it so much. Plus I like thinking that my sharing is encouraging some of you through what I write, or inspiring you with the art or tutorials I share. 
So that's pretty much it. But man, when I look back to my first posts I can see how really far I've come. And best yet, I really like the view. And now, I'm really looking forward to a great year in 2014-

and I hope you are too!!!
Jen

Tuesday, December 31, 2013

Confessions, Resolutions, and Applications- 2014 Begins!!!

Tonight whilst the boys were watching some TV after our pizza and movie party I cruised Pinterest. Love Pinterest.All sorts of ideas and things to try. But part of the show caught my attention. It was a comedy about a little girl who loved to dance but was absolutely horrible. Her dad encouraged her to dance if she loved to dance and not worry about how good or bad she was. I totally related. In fact the "Good Ship Lollipop" started to hum its' way through my mind at once because it was the song I practiced tap dancing to when I was 6 or so and really really wanted to be a dancer. It was from a community ed class and all I remember was shuffle kicking my heart out- but never at the same time as anyone else. I have a memory of always going left when the rest of the class went right and not knowing how to change it. And as I talked to my husband after the tv show wrapped up, a host of other like experiences went through my mind. The Summer ed acting class where I thought I'd shine and instead learned I couldn't act. The drums audition for band where I was kindly told you had to have some sense of rhythm to play percussion. The grade school musicals that I sang my heart out for- but always at the wrong key.Then there was the high school cheer-leading tryouts that I went to because when I was 4 or 5 there was nothing I wanted more to be then a Dallas Cowboy's cheerleader. I told my husband tonight, there was the A squad, the B squad, and then the wrestling cheerleaders. You can guess what team I made-it was the only one where the cheerleaders sat still while they cheered. Always my lack of coordination, inability to tell left from right, and lack of rhythm came up as a block. And honestly, I'm glad today. Because as an adult I can look back and realize that I can't tell left from right because I'm ambidextrous in some areas. I draw better left handed although I'm actually right handed. I really don't have a sense of rhythm but that doesn't stop me from totally loving my Zumba classes- and there is no one better then me at singing and dancing in their pj's when my favorite song comes on. Even so, with all these memories of things I tried growing up, only to realize they weren't "my thing" I started to think of all the people out there making resolutions tonight. Resolutions to eat better, live better, be better. And I think I'm going to resolve to pretty much stay who I am.
 Because finally after 39 years I found out what I really love to do and what I really do well. Because although I couldn't make a basket if my life depended on it, although I'm master of the "spontaneous solo's" at Zumba, and although my singing is still off key, I love so much about who I am right now. I love that I have an amazing family, a job/ministry I love and believe in, a host of sweet and supportive friends, and a list a mile long of things I can't wait to learn and try. I love that God made me an artist and gave me a way of seeing the world that is pure art. I love that I can take paper and paint and fabric and glue and make something absolutely unique that glorifies God with it's creation. I love that I get to introduce other people to their own creativity and encourage and empower them to use it.
Life is pretty good. There are hard things, I have a couple of deadlines right after the holidays that have had me working over the holidays, and there's always the seasonal depression looming at this time of year, but even those a bright side. I had to work, but oh my gosh am I glad that I get to do what I love, with people I love, for people I love. The seasonal "blues" are there but they make me pay closer attention to how I feel and they make me force myself to get involved with projects and people to stay engaged.
So tonight, think a little about the you that you are and not the you that you wish you were. It's ok to want to live better, eat better, be better but make sure it's a better You that you're resolving to be and not a better someone else. Does that make sense? Appreciate who you are, do all the things you love whether you're any good at them or not, be excited about the amazing gifts and abilities you were given and be passionate about the things God's given you a passion for. Resolve to be a "you-er" you to quote Dr. Seuss, because there's no one else just  like  you.
But I'm also going to resolve not to resolve. But to be open to what God might have planned for me. Life never goes exactly the way I think it will anyways, and if I leave it up to God it's usually much better then I could have "resolved" to have it. But I'm all for dreaming because I think that in the dreams, God's preparing you for what He might have planned. So tonight- don't resolve. appreciate you. Let God lead- but go ahead and dream. Dream Big.

Thursday, July 4, 2013

Fourth of July Corsage Tutorial With a Sneak Peek!!!

I wrote this post 2 years ago but still LOVE this tutorial so if you haven't seen it- check it out and at the end I put a sneak preview of the corsage I'll have a tutorial for in the next Somerset Seasons and Holidays out in September!!!

Happy Fourth of July!!! To celebrate today's holiday I whipped up this sweet little holiday corsage yesterday. It's red, white and blue at it's best. With a little imagination and fabric you can easily adapt this tutorial to any holiday or special occasion. I think this would be a lovely finishing touch to your outfit when worn to a wedding or garden party. The design is meant to be reminiscent of the ol' time corsages worn high on the shoulder but because of the versatile pin back/clip combo it can also be worn as a hair accessory or you can clip it to a long necklace for a focal accent. However you choose to wear it- Enjoy!
------------------------------------------------------------------


Fourth of July Fabric Corsage Tutorial

Tools and Materials
Scissor
Needle
Embroidery floss or thread
Variety of coordinating fabrics (I used Moda)
Canvas cloth
Bit of ribbon or other trims if desired 
Glue gun with glue stick
Pin back/clip combo (found it at Hobby Lobby) 

Step One: Rip or cut a strip of fabric approx. 2' in length by 2 1/2" in width. 


Step Two:  Fold the strip in half width-wise, hold and tie a knot an inch or so from one end of the strip 


Step Three: Thread your needle and pierce your knot in the center then begin to wrap the strip around the center knot, adding a stitch here or there as you go to hold the shape. 


Step Four: Give the fabric a twist here or there before adding a stitch to create the form and appearance of petals.


Step Five: When finished, add a few more stitches to the base of the flower to secure. Then add a couple of stitches up and through the center. Knot off at back and cut thread. 


Step Six: Choose a couple of coordinating fabric and cut 2-3 leaf shapes. Place on canvas and leaving a 1/4" border cut around your patterned fabric. Rip a few more strips to hang down decoratively from corsage as well.
Step Seven: Play around with your positioning and then stitch leaves to back of fabric flower as desired. Feel free to embellish your leaves by stitching around their edge or adding some buttons or beads. To add dimension to the leaf, pinch bottom and stitch to hold as shown. 


Step Eight: When you've finished assembling your corsage and stitching it all securely in place heat up your glue gun and adhere pin back to back of flower. Hold for a few seconds for better bond.  Alternatively, you could stitch on a pin  back. Make sure to position slightly high on back of corsage so it hangs well.  

Wear with patriotic pride 
(and 'cause you know you look good).

Best Wishes to you and your family- I hope you have a fabulous Fourth of July!!

And here's your Sneak Peek.Enjoy!!!!
4th of July Corsage- 2013

Wednesday, July 3, 2013

"Seeing Stars" Wreath to Celebrate the Fourth!!!

 It's almost the Fourth and I have a cute little wire wreath tutorial today to help you celebrate in Style. So if you've been wishing for something new to help decorate the porch for the day tomorrow, to hang at the front of your kids' trike in the kiddie parade or to hang on the mailbox this is quick and easy fix. I had all the materials on hand, and if you don't, then I promise they're easily found at your latest craft store.


Fourth of July "Seeing Stars" Wreath
Tools and Materials
wire wreath form (spray painted cream- Valspar)
Martha Stewart brand craft paints in red and blue
paint brush
craft mat (optional)
wooden stars assorted size (comes in a pack)
buttons in red, white, and blue
sandpaper
craft drill with piece of wood to drill into
19- 21 gauge wire
wire cutter
coordinating ribbon


 Step One: Paint the wreath with the red and blue craft paints as shown in top pic. The reason I recommend the MS paint here is that it will adhere to the metal of the frame. It takes a week or so to cure completely but they'll be dry to the touch within 10 minutes.I painted loosely, not covering the frame completely. Set aside.


 Step Two:Paint your wooden stars. I used 3 large stars, 5 medium stars, and 2 small stars.Sand the edges of the stars once dry, if desired.


Step Three: Using your craft drill or regular drill with small bit, drill a hole in the center of each star.


Step Four: Cut a 4-5" piece of the thin wire and bend over like a hairpin. Then, thread through button from top and insert both wires through hole in center of the star.


Step Five: Wire your stars to the wire wreath frame where desired, or you can check out my placements in the pic.You could also stack the stars for a more elaborate look.


 Step Six: Add your ribbon and  you're done!
Some ideas for altering the design would be to add a wire word like freedom, maybe adding some wire stars made from 16-gauge steel wire, or doing a cute little fabric pennant across the center that says something patriotic, instead of the ribbon. Fourth of July ribbon is super cheap at the craft stores right now, and will get cheaper in the next few days. But play around, make one like mine, or make your own! Just have fun and Enjoy the Fourth!!!!!

Wednesday, June 26, 2013

A New Day and a New Post (With a few new Obsessions as well)


Hello All! I've been away for a while again and have been waiting for the right time to post again. This morning I woke up and really felt like it was time. A year ago that would have meant booting up the laptop, downloading my photos, and grabbing a cup of coffee. This morning, on a whim, I decided to see what I could do with my ipad and wireless keyboard and so within seconds of downloading the blogger app for ios onto the ipad I was up and running on this post. I LOVE THAT!
Why I am supposed to post this morning? I'm not sure but I do have a ton of stuff to share with you.
It's been a while! First, Obsession Number one! I am now on my sixth piece of Alabama Chanin inspired hand embellished clothing. I started drooling over designer Natalie Chanin's work back when her first book came out. But it wasn't until her latest, Alabama Studio Sewing and Design came out, and my Mother-In-Law became interested as well, that I actually attempted any of her work. My MIL did all the hard set up work that comes with any new project. She figured out how to cut the stencils, how to paint the fabric in your kitchen, what paints and brushes work best, and even adjusted a couple of the patterns. THEN, she walked me through some basic dressmaking skills. For instance, the arrow that's on a pattern piece IS important! I thought it was just a hint as to which direction to place the pattern piece on the fabric. My MIL showed me how to use it to measure against the edge of the fabric to ensure the grain of the fabric is perfectly lined up so that the dress hangs nice. I started this dress last July and finished it right before Christmas. I also made a couple of bolero's, a skirt, a couple of shirts, and am working on a long skirt now. It's perfect for picking up and setting down whenever I have a little bit of time.

Thrift Store Finds Painted with Chalk Pain
Next, Obsession Number two! I admit I have fallen hard for Annie Sloan's line of Chalk Paints. This one was my own mother's fault. She took a craftsy class last fall about upcycling furniture and started encouraging me to try painting some pieces with her. I had heard so much about Annie's paints that it wasn't too hard to convince me to give them a try- one thrift store chair later and I was hooked. It's another down time sort of activity. And it's quick. A small table or chair takes just a few hours. The colors are beautiful and the finish is gorgeous and I'd highly recommend you give them a try. I'll tell you more about that later.
The other extra time user up for me has been my volunteer work for the arts ministry, Art 2 Heart. I'm on the leadership team and it has been such a gift from God to pair me with this group of women. I'm part of a team there and love the companionship and sense of purpose we all share. Being an artist is lonely business sometimes and if you're somewhat introverted like I am, with a light deprivation sensitivity it's  easy to crawl into a shell in October only to emerge in April or May. This year I struggled, it was so so grey and spring took so so long here in MN. BUT being involved with my sisters at Art 2 Heart, bible study, and my family all really kept me from completely cocooning.
The June Ladies' Night at Art 2 Heart
I think the biggest reason I took a break from blogging wasn't that I was occupied elsewhere, or struggling with my moods, or had new hobbies, or new relationships to explore, but because my life has really changed and I wanted to have the opportunity to step back and see what was really important to me. Who I have become. Who God has led me to become, in the last couple of years. When I first began this journey I was a frustrated new mom struggling to find myself in that new role. Then I was a scrapbooker, a knitter, and then a wire and fabric fanatic. I was taking chances in a big way for the first time in my life, I had my first magazine submissions, my first magazine publications, my first audacious thought about writing a book, and then a couple of years after, my first book was published. I thought that was the end all be all but realized that it wasn't. There was more but I needed to discover what that was. What comes next? The world says make a big deal of your self, promote yourself, market yourself, at the expense of privacy. And it didn't feel right. I really believe that it's God and the Holy Spirit working in me that has led me here. So how to give Him the glory?
So I've stepped back from it all, done some searching, some reading, some writing, kept up with my magazine submissions, and my volunteer work but not much else. Now, months later I really feel like I'm on much firmer ground. 
prototype ideas for Art 2 Heart
This post was an update post. What I'm obsessing about, what I've been creating, what I've been struggling
 with; it's not my favorite kind of post. I like teaching and inspiring and sharing, but sometimes, I just want you to know what's going on. What's real and authentic. So will I continue with the blogging? I think so- especially now that it works into my day a little more conveniently then it did before. And especially now that I feel I have a voice again that's authentically me. It's just taken me a little while. Thanks for your patience!!!! 

UPDATE: 9:23pm So the oh so convenient ipad/google+ way of blogging that I thought was going to work so well ended up with my deleting several hundred photos. Some of which were on this blog so please bear with me the next couple of days while I update. 

Thursday, January 24, 2013

Cream and Red Very Vintage Wreath Tutorial

So it's kind of funny- I haven't been a good blogger for quite a while now but I keep taking pics like I am. So every project I think you might be interested in I step out as I do it. My hearts here, it's just the rest of my life that conflicts. Anyways, I made this wreath before Christmas but I think it's something that fits better now, at this time of the year. Very Valentine's-y Enjoy!!!

Step One: Gather materials and tools. I used a straw wreath form, strips of heavy muslin, vintage and found buttons, some vintage trim, a glue gun (with extra glue sticks), and a scissor. 
 Step Two: With your strips of the muslin, wrap your wreath form. If you want to put a dab of glue where it first overlaps you can. I wouldn't advise gluing to the wreath unless you removed the plastic covering the straw. I didn't.
 Step Three: (Step 2 1/2 should be hit your local thrift shops for some vintage tablecloths, dresser scarves, etc.) Step Three resumes with cut apart the vintage linens you have. Just randomly in pieces that would wrap over the wreath frame but not necessarily around it. Why waste material where you can't see it- right? Hot glue these to the covered wreath frame. A few dabs at the edges should do it.
Step Four: Hot glue buttons to the covered frame. Again, I covered the three sides that show. No pattern, just random.


 Step Five: This is where you improvise. I used some vintage crochet trim I found at an occasional sale. If you had lace you could dye it red, or you could just use some red ribbon, or if you happen to find red crochet lace then you're golden. To make the rosettes I just coiled the lace in my hand and then holding the shape tightly I used hot glue to adhere it to the wreath form. I had to add some glue inside the rosette here and there to hold it's shape as well. Then add a pretty vintage button to the center, a few lengths to the side as tails and you're done!!! Step back and admire the bright shot of red and lace this adds to your home.

Saturday, December 15, 2012

MORE Book Pages Christmas Decor

So yesterday I had a little tinseled garland out of vintage dictionary pages. Today I wanted to show you a few more ideas. You can also check out my pinterest board Remaking the Book for more ideas of what other people have done. But here are some of mine....

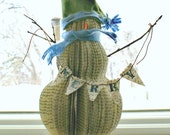
First, check out the SUPER cute little book paper snowmen!!! My dad cut these out of Lemony Snicket books I found at the thrift store and then my mom took over and hot glued the spine to create a circle and then between each and every page so that they fan out. She has WAAAy more patience then me. Talk about tedious and man does it use up the glue sticks. But as it was my mom and not me being tedious, I was lovin' them and had my dad cut eight more. After she did the tedious part, I got in on the act and used the spine and cover of the book to made a little hat for it and a little nose. I was trying to reuse as much of the book as possible. We also added a little scarf and two little birch stick arms. Then my mom had the BRILLIANT but again tedious idea of adding a little mini banner. So she punched out all those cute little triangles with a nifty little punch that she has. Next, she brushed on some glitter paint. I mean, these turned out SO DARN CUTE!!!! Can you believe it?  I took the first nine and brought them into Art 2 Heart, where there are a few left should you want one. But THEN, can you believe it, she kept going and she went and made the cutest little trees for them as well. These were from book pages again, but she mounted them onto old candle holders for a truly sweet vintage look.
 IF, you don't feel like rushing out and trying this out for yourself, my parents do have an etsy shop, The Old Shop Teacher,  where they are selling a few more of the snowmen and trees that they JUST finished. She made one with a little gnome hat, and another is looking debonair in a cap. She got pretty creative- don't you think they are absolutely adorable???

I also made up a wire and paper tree that I couldn't wait to show you. I saw one in a shop and completely unable to afford the $100+ price tag I went ahead and made my own version. I mean, it was wire- I felt I had to be able to figure it out or I couldn't claim to be a wire artist. I did figure it out, but it was another tedious project and for this one I was on my own. So I stayed up really late one night and made one. I am EXTREMELY happy with how it turned out, and would you believe it's only my same old 16-gauge steel wire, some more dictionary pages, and a small wooden block? The block I painted with gesso, wrapped with some patterned washi tape and then sealed it with medium. The star at the top and the sweet little garland on the tree are vintage mother of pearl buttons. I have a quick little step out for you of that. I'll post that tomorrow. It's my 3 or 5 days of Christmas projects blitz- ENJOY!!!!!

Thursday, November 15, 2012

Making Snow Scene Jars

Whilst I've been working merrily on the poinsettia projects (putting them on wreaths, tweaking, making wire words etc.) I've been fitting in some of the fun Christmas projects that have been swirling around in my head like a little snowstorm. One of these are the cute snow scene jars I've run into on etsy, pinterest, etc. I found a link to a tutorial on Rhonna Farrer's blog which you should really hop over and see, but I've also stepped it out here for you as well. :) Cause it's fun.

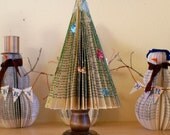
Snow Scene Jars- Shaken and 
Stirred Glittery Fun
So disclaimer, I had my son help me with this project. I was shamed into it by a friend who crafts with her daughters all the time. Never mind that they're a minimum of 3 years older then Jasper who's seven. Never mind that they're sweet creative souls, and my son is well, a boy; I thought it was a dandy plan. So last Sunday after a quickie trip to Jo Ann's for some glitter, and mason jars we were set. Here's the supply list, we had much of it at home already.

Tools and Material List
Glass jars (we used different sizes but I decided I liked the wide mouth jars best bc of the proportion when tipped upside down)
Fake snow/batting tuffs
Glitter
Little woodland or arctic animals (check your local bakery for the cupcake picks or buy one of the forest or arctic animal toobs from the craft store- we had a huge container already.)
Bottle brush trees (BIG hint but these are cheapest at Home Depot- $6.97 a 21 pack vs. $19 at craft stores)
Little twigs, rocks or other natural elements
Hot glue gun with ammunition
Surface to hot glue on
Some little bits to create height, little sewing spools, glass pebbles, corks, etc.
optional: Paint and brush for lid of jar or to paint decorative items like twigs. Glitter paint is fun on animals too!

Step One: Gather all supplies and clear a surface to create on. I put down a craft mat and was super glad I did. Everything peels off those and their heat resistant.


Step Two: Unscrew lid from jar and on inside, hot glue in center of lid, your spools, corks, pebbles whatever to create height you want. The higher the trees and animals are raised up the more snow you have to add to hide that area. But the more they're raised the closer to eye level they are and it looks like big snowy drifts which is cool. You can also tuck in tufts of batting to hide spools and corks.


Step Three: Hot glue tree, animal, igloo, whatever you have on top of height creating items.Make sure it all fits within circumference of lid top. If you'd like to paint, or glitter your items do that before gluing them in place.


Step Four: This is the step your boy will like so much they won't want to help with any of the rest of it from now on- just this part. (This is also the part your husband might walk in, notice the glitter, the hot glue cords stretched to the table, and the seven year old shaking lots and lots of glitter, some of it into a jar. Don't worry your husband will probably get that deer in the headlights look, spin around and head back to his office until dinner). In jar, add fake snow, toss in a couple of shakes of glitter if you'd like, and gently insert decorations into jar and screw lid tightly down. Now, if you're lucky you have just enough snow. If you're more trial and error (or distracted by your child), you'll have too much or too little. Don't take everything out and off, just invert jar so it's right side up and unscrew top. Pull open enough to shake out some excess snow or to add more. Then screw tight again, and invert. At this point I also decided I wanted to paint my lids so I did it with them all ready assembled. But I'd probably recommend doing this at the beginning. They'd look really good glittered too I'd think.


Can you see the giddy boy glee as he shakes?
Step Five: Make lots more. Looking at his old box of animal toys my son's decided we need a killer whale snow scene, a cow snow scene, and a manatee snow . Yup. Display and Enjoy!!!! Oh, and clean up isn't nearly as bad as you'd think. ;)