Saturday, December 15, 2012

MORE Book Pages Christmas Decor

So yesterday I had a little tinseled garland out of vintage dictionary pages. Today I wanted to show you a few more ideas. You can also check out my pinterest board Remaking the Book for more ideas of what other people have done. But here are some of mine....

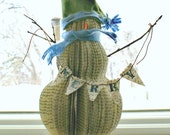
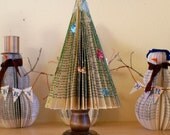
First, check out the SUPER cute little book paper snowmen!!! My dad cut these out of Lemony Snicket books I found at the thrift store and then my mom took over and hot glued the spine to create a circle and then between each and every page so that they fan out. She has WAAAy more patience then me. Talk about tedious and man does it use up the glue sticks. But as it was my mom and not me being tedious, I was lovin' them and had my dad cut eight more. After she did the tedious part, I got in on the act and used the spine and cover of the book to made a little hat for it and a little nose. I was trying to reuse as much of the book as possible. We also added a little scarf and two little birch stick arms. Then my mom had the BRILLIANT but again tedious idea of adding a little mini banner. So she punched out all those cute little triangles with a nifty little punch that she has. Next, she brushed on some glitter paint. I mean, these turned out SO DARN CUTE!!!! Can you believe it?  I took the first nine and brought them into Art 2 Heart, where there are a few left should you want one. But THEN, can you believe it, she kept going and she went and made the cutest little trees for them as well. These were from book pages again, but she mounted them onto old candle holders for a truly sweet vintage look.
 IF, you don't feel like rushing out and trying this out for yourself, my parents do have an etsy shop, The Old Shop Teacher,  where they are selling a few more of the snowmen and trees that they JUST finished. She made one with a little gnome hat, and another is looking debonair in a cap. She got pretty creative- don't you think they are absolutely adorable???

I also made up a wire and paper tree that I couldn't wait to show you. I saw one in a shop and completely unable to afford the $100+ price tag I went ahead and made my own version. I mean, it was wire- I felt I had to be able to figure it out or I couldn't claim to be a wire artist. I did figure it out, but it was another tedious project and for this one I was on my own. So I stayed up really late one night and made one. I am EXTREMELY happy with how it turned out, and would you believe it's only my same old 16-gauge steel wire, some more dictionary pages, and a small wooden block? The block I painted with gesso, wrapped with some patterned washi tape and then sealed it with medium. The star at the top and the sweet little garland on the tree are vintage mother of pearl buttons. I have a quick little step out for you of that. I'll post that tomorrow. It's my 3 or 5 days of Christmas projects blitz- ENJOY!!!!!

Thursday, November 15, 2012

Making Snow Scene Jars

Whilst I've been working merrily on the poinsettia projects (putting them on wreaths, tweaking, making wire words etc.) I've been fitting in some of the fun Christmas projects that have been swirling around in my head like a little snowstorm. One of these are the cute snow scene jars I've run into on etsy, pinterest, etc. I found a link to a tutorial on Rhonna Farrer's blog which you should really hop over and see, but I've also stepped it out here for you as well. :) Cause it's fun.

Snow Scene Jars- Shaken and 
Stirred Glittery Fun
So disclaimer, I had my son help me with this project. I was shamed into it by a friend who crafts with her daughters all the time. Never mind that they're a minimum of 3 years older then Jasper who's seven. Never mind that they're sweet creative souls, and my son is well, a boy; I thought it was a dandy plan. So last Sunday after a quickie trip to Jo Ann's for some glitter, and mason jars we were set. Here's the supply list, we had much of it at home already.

Tools and Material List
Glass jars (we used different sizes but I decided I liked the wide mouth jars best bc of the proportion when tipped upside down)
Fake snow/batting tuffs
Glitter
Little woodland or arctic animals (check your local bakery for the cupcake picks or buy one of the forest or arctic animal toobs from the craft store- we had a huge container already.)
Bottle brush trees (BIG hint but these are cheapest at Home Depot- $6.97 a 21 pack vs. $19 at craft stores)
Little twigs, rocks or other natural elements
Hot glue gun with ammunition
Surface to hot glue on
Some little bits to create height, little sewing spools, glass pebbles, corks, etc.
optional: Paint and brush for lid of jar or to paint decorative items like twigs. Glitter paint is fun on animals too!

Step One: Gather all supplies and clear a surface to create on. I put down a craft mat and was super glad I did. Everything peels off those and their heat resistant.


Step Two: Unscrew lid from jar and on inside, hot glue in center of lid, your spools, corks, pebbles whatever to create height you want. The higher the trees and animals are raised up the more snow you have to add to hide that area. But the more they're raised the closer to eye level they are and it looks like big snowy drifts which is cool. You can also tuck in tufts of batting to hide spools and corks.


Step Three: Hot glue tree, animal, igloo, whatever you have on top of height creating items.Make sure it all fits within circumference of lid top. If you'd like to paint, or glitter your items do that before gluing them in place.


Step Four: This is the step your boy will like so much they won't want to help with any of the rest of it from now on- just this part. (This is also the part your husband might walk in, notice the glitter, the hot glue cords stretched to the table, and the seven year old shaking lots and lots of glitter, some of it into a jar. Don't worry your husband will probably get that deer in the headlights look, spin around and head back to his office until dinner). In jar, add fake snow, toss in a couple of shakes of glitter if you'd like, and gently insert decorations into jar and screw lid tightly down. Now, if you're lucky you have just enough snow. If you're more trial and error (or distracted by your child), you'll have too much or too little. Don't take everything out and off, just invert jar so it's right side up and unscrew top. Pull open enough to shake out some excess snow or to add more. Then screw tight again, and invert. At this point I also decided I wanted to paint my lids so I did it with them all ready assembled. But I'd probably recommend doing this at the beginning. They'd look really good glittered too I'd think.


Can you see the giddy boy glee as he shakes?
Step Five: Make lots more. Looking at his old box of animal toys my son's decided we need a killer whale snow scene, a cow snow scene, and a manatee snow . Yup. Display and Enjoy!!!! Oh, and clean up isn't nearly as bad as you'd think. ;)


Monday, September 10, 2012

There And Back again...and again.. and again....


Traveling the Bear Tooth Highway, MT
 I've truly been there and back again in the last few months, only to make a few more trips of it. How about you? Was your summer crazy too? I was cruising along in May and even June but at the beginning of July I just kind of hit a road block and had to make some choices. The result of those choices had me basically turning off all electronic pulls on my time. No facebook, no blogging, no reading blogs, etc. for the rest of the summer.

See I was having a really hard time working, being a full time mom, keeping my depression at bay, producing art in quantity, staying in touch with friends and family, as well as meeting what I thought was others expectations for me, and my expectations for myself. I try to be the best mom to my son, housekeeper, cook, wife, artist, writer, friend, and christian I can but I have to admit trying to do it all, all the time is a little nuts. During the school year my time is better segregated. I know I'll have blocks of time I can devote to each but during the summer everything gets all blurred.

Stopping to see the View
So all of August I took time off. I tried not to do too much art and crafting, I did the minimum required of me for my job, I checked out of the volunteer work I do, and tried to get back on an even keel. Kind of the time equivalent of a bonus check on the budget. It catches you up and allows you to start the budget fresh again.

Summer Roses in Bismarck,ND

 I have to believe I'm not the only one who ever has to start over. I know the cover of the Sunday insert had Katie Couric saying something about life being a series of reboots. Taking time off to turn off was challenging. To be honest I couldn't do it in pieces, I tried that. In the end it took completely checking out, removing myself, and reading books. I get lost in books and hadn't read for quite a while so I made big use of my library card this last month. Found some really good series and let my mind rest. How do you reboot? Do you find you need to unplug entirely or do you have a daily or weekly ritual that re focuses you? I'd love to know if you have any tricks for finding and keeping balance. 

Playing with Dolls...:)
Besides distracting myself with books, I've been trying to play. I've found that giving myself permission to just play and follow some whims usually brings me to a new place that was just where I needed to go. So I made some dolls in August. One for the new little niece I visited in mid August and another for a new little adopted niece. That one isn't quite finished yet but I'll post pics when it is. I'm also making some fall clothes Alabama Chanin style. It's so so fun and just a little bit obsessive but the end result is just gorgeous. I have a dress that's partially done and a bolero I just finished. I'm excited about both. There's just something about fall that makes me want to be a fashion designer. This year the Alabama Chanin remake is in full swing. :) I'll keep you updated. 

Close up of my Alabama Chanin Style Dress in Progress

Tuesday, July 10, 2012

Some Ideas on Ways to Play and Help Others Too!

Art 2 Heart- Missions Gift Shop in Hamel
 One of the absolute best things about the product development roll I took on last spring with Art 2 Heart is the ability to match people with hearts to projects that help. That involves knowledge of both the skills required or possessed, and the interest of the crafter. It's sheer torture to tell someone who works with knits to make bracelets if they don't want to. So, if you've considered using your mad craft skills to help others, a first word of advice, stick to your interest group. Only participate if it's something you'd genuinely enjoy doing. Next, do you want to work alone or in a group? If you can't find a group- would you consider making one? It's super fun to create with others. You can approach the group in two ways as well. You can see it as a bunch of gals pounding out the projects, or you can see the group itself as a mission. Are you willing to bring in newbies and teach them the how-to's? Would you like to involve local immigrants or the handicapped? Also, consider that just because you're an at home sort of person, groups can and do form online every day around a specific interest. Spend a little time searching and I'm sure you'll find something of interest! I've also included a few at the end of this post to get you started.
The cutest! A doll pattern from Oh So Dollin- LOVE!!!
Third consideration, how much are you willing to donate? Is is just time that you have, or do you have a stash of fabric that you'd love to use up? Are you willing to finance your work with the goal of donating it? I thought that to support a group I needed to make all my contributions donations. A friend suggested to me that I do consignment to cover the cost of materials and donate what's profit. Additionally, you can work with a gift shop that donates it's proceeds to missions and consign with them. They get a percentage of the sale plus you can gift them with whatever is above what you need to cover your costs.
More ideas then crafting time?Consider donating ideas. There are really great groups of sewers, jewelry makers, diy crafters and pinterest devotees who are just dying for a way to play and help too. But they need ideas. They need to know what they can make that will really make a difference. Maybe that's baby blankets for a local crisis nursery, or knitted newborn hats for a local preemie ward, or maybe it's something else. I ran across a blog asking people to knit sweaters for penguins once. They'd been saved from an oil spill but weren't able to keep themselves warm. They needed sweaters. SO SO cute! Or the crafter might be creating goods for sale with proceeds going to a mission organization. Then they need someone with an eye to current trends who is able to pinpoint projects and help them get off the ground by maybe supplying step by steps and/or samples or someone willing to come and teach. We had a student at the shop who wanted to help but the paintings she donated weren't selling. I heard they were great but wall art just wasn't moving there. SO my group suggested she try the stamped jewelry and found her a class and aided with the set up and it's been a fabulous success! She is truly truly amazing and what she's done for others has just rocked our world.

 But today I wanted to start to share just a few more with direct links. Maybe you'll decide to help out one of these missions, maybe it'll give you ideas for starting your own. God can and will use every skill you have if you allow Him too. Trust me!


First up today- as I was looking for a cute baby doll pattern I stumbled across the blog, Dolly Donations. They provide the pattern and you donate the dolls. Then they distribute them in places like Rwanda, Uganda, and Haiti. Dolls are both companions and security for little girls, I think this is a great ministry. Maybe you want to take this idea and provide Korean looking dolls for your local adoption agency. I bet that new parents would love to gift their child with a special doll as they prepare to bring them home. Once, when I called 911 and and rescue truck came they gave my son the cutest little bear to help him be brave. It was something I appreciated with my whole heart.
Here are a couple more cute patterns that you can purchase and adapt to whatever you have in your heart to do.
This cute pattern by Wendi Gratz  is available to purchase on Craftsy

Another cute pattern by oh so dollin  on Craftsy


There are lots more groups like this and I have a feeling there'll be lots more to show you so check back in the next few weeks for more! Thanks for Reading and have a great day!!!

Monday, July 9, 2012

Vintage Style Jewelry Displays

I know, I know... you've seen it done before. An old frame turned granny chic fab as a jewelry display. I even posted this tutorial showing you how to turn an old frame into a ribbon holder. It's been done. I know...

 I've also got a peak at a new idea I've been playing with using my collection of old trays. We're trying to redo the jewelry displays at Art 2 Heart for summer and these were the ideas I've come up with. I think these turned out pretty fab so I thought I'd show you the pics and do a little how-to.


First, you need an old frame or two. You also need corkboard or foam core cut to fit said frame. Then, you take that big ol' roll of muslin you have stashed and cover the corkboard with it. I wrapped my frame and then used a staple gun to secure it. I've also used duct tape. It works. 

 Next, you get to decorate. You can either choose option a) and glue on doilies, or b) stencil a doily border, c) both of the above, or I guess d) leave it as is.

In this next pic you can get an idea of the finished concept. I used wire flowers I'd sprayed cream and just hung them on a push pin that I'd inserted into the corkboard. They look like little handles.

 Another idea I had was to use my old tray collection. With a crop-a-dile big bite and a package of Tim Holtz brand decorative hardware you can make this in about, oh, 5 minutes. I'm going to use E6000 to attach a hanger to the top back of this but it would look great displayed in a small easel as well.
So there you go- a little daily dose of inspiration. Hope you enjoyed it!!!

Wednesday, July 4, 2012

A Little More Fourth.... Fourth of July Fabric Corsage

Encore from Last Year's Fourth on the blog: Enjoy your day!!!!

Happy Fourth of July!!! To celebrate today's holiday I whipped up this sweet little holiday corsage yesterday. It's red, white and blue at it's best. With a little imagination and fabric you can easily adapt this tutorial to any holiday or special occasion. I think this would be a lovely finishing touch to your outfit when worn to a wedding or garden party. The design is meant to be reminiscent of the ol' time corsages worn high on the shoulder but because of the versatile pin back/clip combo it can also be worn as a hair accessory or you can clip it to a long necklace for a focal accent. However you choose to wear it- Enjoy!
------------------------------------------------------------------

Fourth of July Fabric Corsage Tutorial

Tools and Materials
Scissor
Needle
Embroidery floss or thread
Variety of coordinating fabrics (I used Moda)
Canvas cloth
Bit of ribbon or other trims if desired 
Glue gun with glue stick
Pin back/clip combo (found it at Hobby Lobby) 

Step One: Rip or cut a strip of fabric approx. 2' in length by 2 1/2" in width. 


Step Two:  Fold the strip in half width-wise, hold and tie a knot an inch or so from one end of the strip 


Step Three: Thread your needle and pierce your knot in the center then begin to wrap the strip around the center knot, adding a stitch here or there as you go to hold the shape. 


Step Four: Give the fabric a twist here or there before adding a stitch to create the form and appearance of petals.


Step Five: When finished, add a few more stitches to the base of the flower to secure. Then add a couple of stitches up and through the center. Knot off at back and cut thread. 


Step Six: Choose a couple of coordinating fabric and cut 2-3 leaf shapes. Place on canvas and leaving a 1/4" border cut around your patterned fabric. Rip a few more strips to hang down decoratively from corsage as well.
Step Seven: Play around with your positioning and then stitch leaves to back of fabric flower as desired. Feel free to embellish your leaves by stitching around their edge or adding some buttons or beads. To add dimension to the leaf, pinch bottom and stitch to hold as shown. 


Step Eight: When you've finished assembling your corsage and stitching it all securely in place heat up your glue gun and adhere pin back to back of flower. Hold for a few seconds for better bond.  Alternatively, you could stitch on a pin  back. Make sure to position slightly high on back of corsage so it hangs well.  
Wear with patriotic pride (and 'cause you know you look good). :)

Best Wishes to you and your family- I hope you have a fabulous Fourth of July!!!!!
Yo

Monday, July 2, 2012

Catch Up- Pics of Projects

 I just finished writing up a tutorial for you that I 'll post tomorrow but I wanted to toss in this little post to show y'all some of the projects I've been working on the last month or so...

This is a little tote bag for a friend who just had a baby

A Bride badge in the wedding's theme color of indigo

A 18x 18 pillow cover (appearing soon in my etsy shop)

Another pillow cover with hand carved stamps, embroidery, buttons, etc

More of the kid's art totes!

And another....
And here is the inside. A friend helped me finish these up- I think they turned out great!
I'm still working on the sewing skills- here's a little wallet based on this design I found on pinterest
New art for my etsy shop!

Another new piece- I love it!!!
Experimenting with paint...