Reusing Old Books to Make New- Vintage Book Notebooks Tutorial
Tools and Materials
old book
cardstock
paper cutter
tissue tape or some other decorative tape
Cinch machine with wire binding
Wire Cutter
Scissors
Matte Medium or Modge Podge w/ applicator brush(optional)**
Ruler (optional)
Step One: Tear the cover off your book and then separate the front and back cover from the spine. You'll be left with three pieces. For this project we're only using the covers, not the spine.
Step Two: With a scissors, carefully trim the torn edge of the cover.
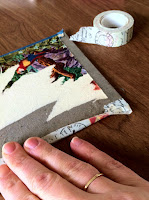
Step Three: Use your decorative tape to tape over the torn edge of each cover piece. Run the tape along the cut edge, folding it over so that half of the tape's width is on either side of your piece. Fold edges down and under. Then, take the tape and run it all the way around the book, overlapping the tape you did first. Run your fingers along the tape, smoothing and sealing the bond.**
 Step Four: Using a page from your book as a template, or a ruler, cut your cardstock into half and trim to length. I used approx. 10 sheets of cardstock for a total of 20 pages.
Step Five: With your Cinch machine, punch holes along the side of one of your book's two cover pieces. This will be the front cover of your notebook. Pull out your sliding rule at the left of the machine, and note the length of the piece. Then, using the written guide on your cinch, pull out the knob it tells you to. My book was slightly irregular so to be sure I got the right number of holes, I punched a sheet of scrap paper first. Make any adjustments, and punch the front of your cardstock again. Repeat with second cover board, but flip this one before you punch so that the inside of the cover board is facing up. The first hole at the top of my notebook's cover is a slighty further in from the top edge then the bottom hole is from the bottom of the notebook. By flipping the bottom piece over, and punching it wrong side up I'm making sure it will line up with the top cover of the notebook.
Step Six: Repeat punching process with cardstock to create interior pages of book. I made the design choice to include the vintage inside fly leaf of the vintage book, and punched that also. The book plate is one my grandmother had in all her books. I love it. :)
Step Seven: Count the number of holes punched and count out that many hooks on your wire binding. Then cut wire at that point. I have 15 holes punched, I counted up 15 hooks, and then cut my wire between the 15th and 16th hooks.

Step Eight: Hang wire on side of Cinch and assemble the book. I did the two covers, right sides facing first, and then added the punched cardstock.

Step Nine: With the book assembled, all you have left to do is to bend the wire tines flush to the wire edging of your spiral binding. To do this, adjust the knob on the back left side of your Cinch to the appropriate wire size (3.4" on mine) and then placing the notebook flush against the back of your Cinch, and under the pressing bar, push down on the handle. This will crimp your wire perfectly.
Step Ten: To protect your skin during use, use a needle nose pliers to curl the sharp ends of your wire so that the cut edge is flush against the rest of the wire. Decorate the cover of your book, and you're done!
**At this time you may opt to use a gel medium to seal the tape's edges. Just brush over the tape, and along the edges of the tape.


3 comments:
You know, I've been known to rob notebooks of their spiral binding and use a whole punch on my covers to create handmade books. So if someone doesn't have a Cinch it's totally possible to create a spiral bound book.
I love that the cover is from a book that was your Grandmother's. So sweet. And the text "it is time"... inspired.
I see you're taking Soul Restoration, too!!:)
This is really cool, I always wondered how they did all those holes and get the curly wired thing in.
Really neat, I must give it a try.
thanks for sharing
Post a Comment