Saturday, July 31, 2010

Local Craftiness: Dreaming Tree Creations

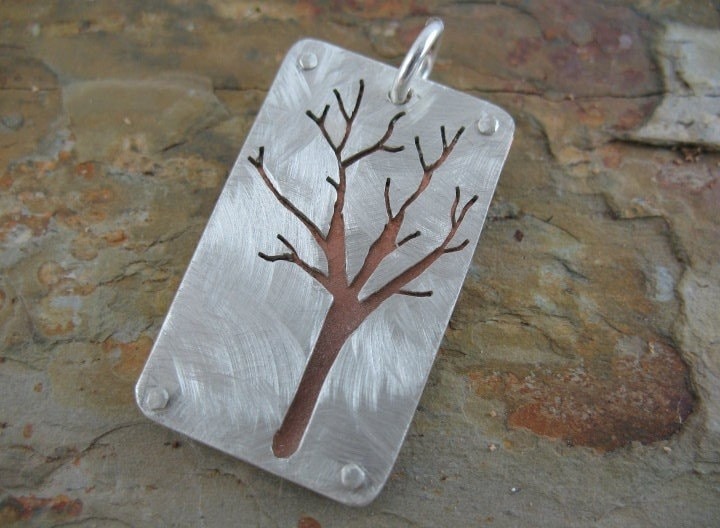
Jewelry on Etsy is easily lost among the sheer magnitude of shops but every once in a while I find one I really adore. Right now I am completely enraptured by simple pendants, stamped with simple statements as well as jewelry that is riveted, cut and worked by hand. Earlier this year I took a class at my local art studio/coffee shop that was taught by Kristy Highness of Dreaming Tree Creations on Etsy who completely captures this look perfectly. I love the workmanship that she puts into her pieces, my fave right now being the handcut jewelry pendant at left. After taking the metal working class from Kristy, my appreciation of the time and patience it takes to create this pieces makes them fairly awe-inspiring. 

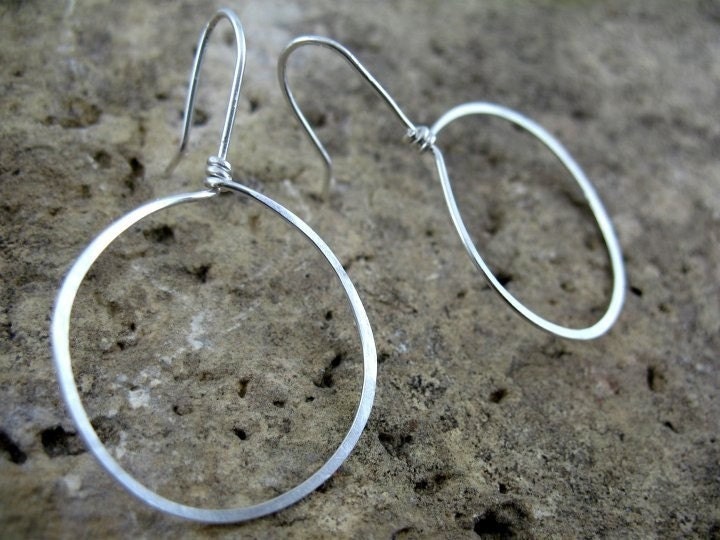
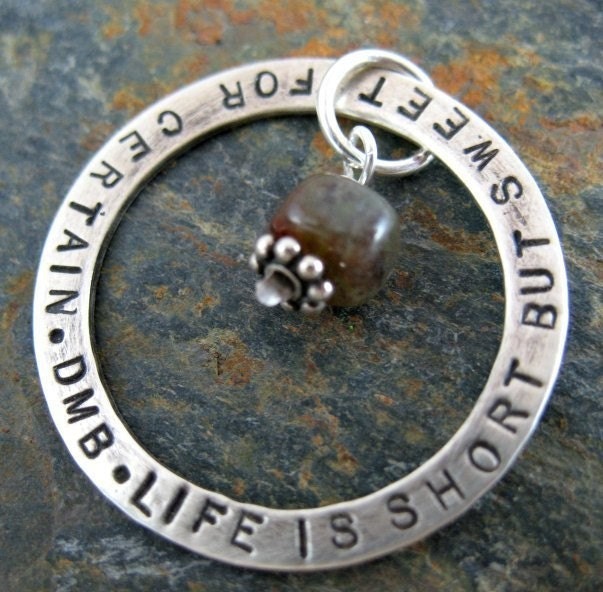
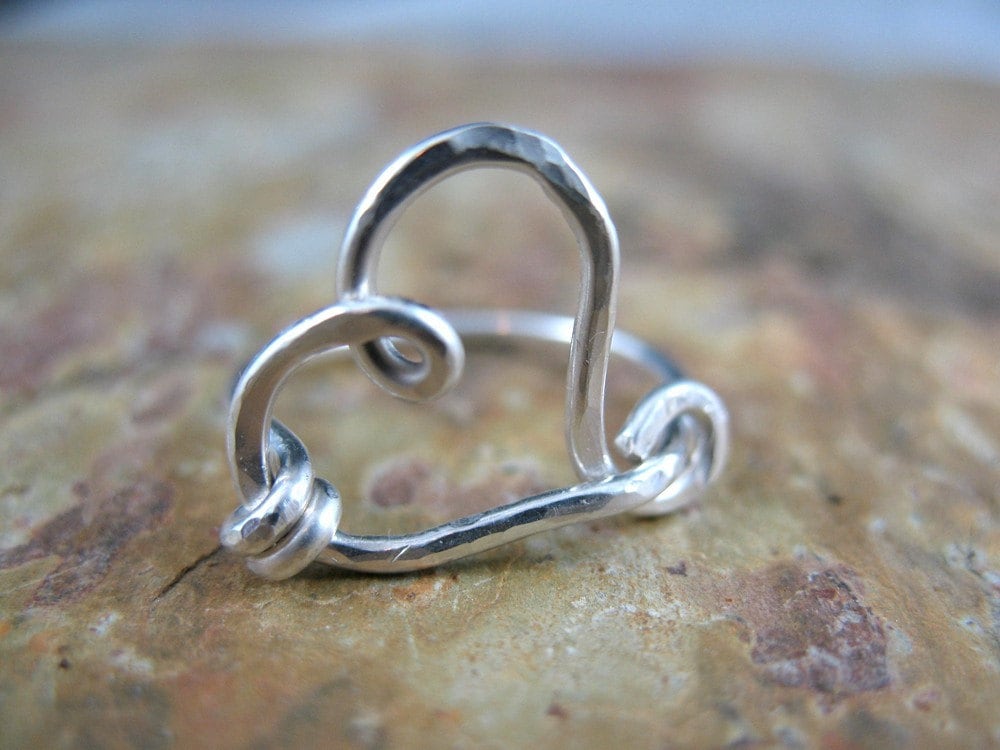
So I've wanted to share Kristy's work for awhile. Then as I was browsing her shop, again today, I saw these pendants stamped with two quotes I love. My husband is a huge DMB fan so I've attended lots of their concerts, and the Ghandi quote is one that I refer to regularly for inspiration (and a motivational kick in the pants). I'm also hugely partial to the sweet little heart ring and the simple wire earrings. She also does custom quotes. I'd love to have you check out her Etsy shop, and if you're local Kristy's work can be seen at the Studio at Rush Creek where she also teaches classes. Dreaming Tree Creations can also be found on facebook here. Still think I might need this pair of earrings, I mean what girl doesn't need a set of fabulous hoops, right?

Friday, July 30, 2010

Published! Somerset Home Vol. 5

I just received my copy of Somerset Home in the mail and am forcing myself to pause in my perusal to write this post. Ok, so I didn't have to quite force myself away but it is a fabulous issue with lots and lots of eye candy.

I'm also excited to see that besides myself, two artists I know and admire are featured in this issue. Dana Barbieri, who I was honored to do an interview for not long ago contributed the sweetest paper flower wreaths, and Julie Nutting has a jewelry board and kitchen board that are amazingly fabulous and serve a practical purpose as well. I have to admit to having a sweet spot where functional art is concerned and these two pieces are functional art at it's best.

I have a story about my metal trays and the inspiration behind their creation. That I hope you'll read. SO check out the magazine when you have the chance- with all the gorgeousness inside you'll be glad you did!

Thursday, July 29, 2010

Fabric Tape Tutorial- Remix

The Challenge: I was trolling through my Google Reader one day when I stumbled upon a reference for a fabric tape tutorial by annekata. I clicked over and found this super cute idea for turning packing tape into fabric tape. I loved the look of it but rather than fabric glued to the back of packing tape I wanted it to be actual fabric tape. To me this meant strips of fabric with an adhesive directly applied to the fabric. So I took this as a challenge and did a little reworking and researching and found a different approach to making fabric tape that I hope you enjoy!

The Process: I began by searching for a cheap readily available double- sided adhesive and although there are many on the market; few have the width that I was looking for. I was also looking for a tape that would adhere well to a variety of surfaces. It had to be paper backed so that I wasn’t dealing with a sticky adhesive while storing the tape, and of course, I’d like it to be inexpensive. The Res Q Tape works great on a variety of media and has the added bonus of fabric being its intended surface. It also comes in 2 widths, one of which is the wider 1 1/2" I was looking for. It is paper backed, so no problem storing it, and at a buck a yard, it was the least expensive of the adhesives I found. Additionally, if you time your purchase with a notions sale or use a 40% off coupon than it becomes pretty inexpensive. I am still combing the hardware and office supply stores for an alternative that is just plain cheap but in the meantime I’m really happy with this product. The paper backing is fairly thick so rolling it as an option for storing didn’t work very well but I’m fine storing it as a strip. So take a look and then give it a try!

---------------------------------------------------------------------------------------------
Fabric Tape Tutorial- Remix


Tools and Materials:
Fabric wider than 1 3/4" and any length desired.
Res Q Tape by Dritz (in 1 1/2" width)
Scissors


Step One: Lay out your fabric of choice on a flat surface wrong side up, and then using your hand to apply pressure, adhere sticky side of tape to fabric. Do not remove the paper backing on the tape.


Step Two: Trim your tape at the bottom of your fabric piece. Flip over fabric and tape and smooth out fabric again applying slight pressure with your hand to ensure complete adhesion.


Step Three: Flip your fabric over again so that the tape is visible (wrong side up) and using the paper backing of your tape as a guide, trim away the excess fabric on both sides of the tape.
.


Step Four: Store your fabric tape in strips with the paper backing in place until ready to use. When ready to use cut to desired length, pull off backing fabric and use as desired.


Here are a couple more projects I did with my fabric tape. One shows the tape cut in half width wise and the other shows the tape cut into triangles to make photo corners. If you hop over to annekata’s site you’ll see some super cute packages she made up with her fabric tape as well as some ideas for its use. And if you can think of way of improving on this tape OR create some of your own, I’d love to hear from you and see some pics of your tape and projects. And if you should feel so inclined please post them to my Facebook fan page so we can all see and drool over your coolness. Thanks again and Happy Crafting!

Monday, July 26, 2010

It's All Who You Know... .

How do you get to where you'd like to be?
Why is it that everyone that is someone knows personally everyone else who is? It's a conundrum (as well as a bit of a tongue twister). I'd guess they didn't all go to school together, I'd guess they met at retreats, or they met online, or one person knows someone who knows someone etc. etc. But it seems as if there's some sweet spot that hosts them all and they just all know each other. And if there is, how did they get there?

It's something I've wondered about from time to time. You see photos of so and so with so and so at such and such event and you wonder. Then this afternoon I stumbled upon an e-class being offered here that is titled "It's All Who You Know.. " It's actually a live teleclass and will come with a recording of that session plus a pdf of it. There will also be a post class Q&A via Twitter. The instructors will let you in on how to meet and talk to the people you want to know to grow your business without seeming like a wanna be or desperate fan. Which I try personally to avoid, but it's tricky. So good for your business, and good for you. If you're interested you need to register before the class date, which is Aug. 3rd. Now you're in the know- :)

Saturday, July 24, 2010

Dealing with Detours on our Creative Journey

We've been on the road again. This time visiting my husband's family and man is it a long drive. There are very few times in life anymore however that I get the time to sit and do nothing and so although it's long I do rather look forward to the downtime the journey, and a few detours or road construction brings.

Which makes me think about other journey's, like the one you and I are on. It's a personal journey with ups and downs, but I think rarely do we stop and think about as a journey. When we do we're frustrated by where we are, or our inability to read the map or even find the map.

I know that I need to remember that sometimes making no forward progress, and taking the opportunity that sitting still and reflecting is, allows us to discover where we are in the journey. For instance I took a class recently and many of the artists were frustrated by their inability to settle down and concentrate on just one aspect of their art. Because I was there just a few years ago and recognize the frustration I realized that they were someplace important to their journey. They were trying and discovering who and what they were interested in artistically. In the midst of it you feel as if you've been traveling for ages but really it's still the beginning. You're doing the work now, that will allow you to go on from there confident, experienced and well traveled.

Sitting in the car I'm thinking about this and wishing I could encourage those who are in that part of their journey. I've only just past that part, I found my wire and fabric, and I know because of past experience that although I feel I've come far and feel as if I must be at the mid point of my journey, that how you feel is deceptive and I still could just be in another stage of that beginning.

The point is that we are on a journey. We are traveling toward something and not sitting at home reading the postcards others have sent us. We are out there, discovering new things, maybe experiencing a detour or two , but still we are journeying.

But today's lesson remains, as I sit here in the car with my Soy Sugar Free Vanilla Coffee Frappucino (another detour story there) that it is important to sometimes set it on cruise, or pull over and check the map and realize where we are, how far we've come, and that we're traveling towards something.

Wednesday, July 21, 2010

Following the White Rabbit

White Rabbit Doll by Mimi Kitchner on Etsy
There are things in life we search out, things we stumble upon, and things we are led to. Often we don't realize until later (perhaps when we're writing a blog post) the circumstances that have brought us to the point we now are. It happens in life in a broad way but it also happens with small things.

Three months ago I was starting to feel a bit panicked because my book was written and I was approaching step 2- market it. As lost as I felt writing the book, the thought of marketing it was worse. I'm simply not a salesman but I really believe in the message of this book. It's a book of inspiration and encouragement as well as an introduction to fabric and wire. So I really would like to get the word out- but how? I am no more a marketing maven then I am a techy guru.

That was three months ago. Let me fill you in on what's come my way since. It started with a notice I saw for Kelly Rae Roberts' business e-course. It intrigued me and after reading her description I really felt like I should take this course. I'd never done an e-course but liked the idea and thought if nothing else it'd be good for me to see how they work. The class was fabulous. She filled all her posts with both information and encouragement. 

Here is the one quote that really got to me:  "When we value what we’re doing enough to promote it, then folks will see that. You’re telling the world that not only do you find worth in what you are doing, but that you are taking your creative biz seriously, that it matters, and that you are celebrating its journey.  This speaks volumes to your readers and customers. You have to value what you’re doing and creating (enough to promote it) before anyone else will believe there is value and worth to what you’re doing and creating."- Kelly Rae Roberts

I keep that quote on a sticky note on my computer screen so I see it daily. It's such a positive reinforcement that the marketing we're doing of our art, or our writing, or our blogs is important and is how we show the world we believe in what we're doing.

Since then one resource after another has come to me. I was chasing my 5 year old through the stacks of our local library one day (thus the white rabbit analogy) when I stumbled into (literally) the marketing area. Down that rabbit hole I found the Idiot's Guide to Guerilla Marketing by Susan Drake and Colleen Wells and a book called, The Next Evolution of Marketing by Bob Gilbreath that is all about marketing with meaning. THEN I discovered Craftypod and Hello Craft, two podcasts that focus a lot of handmade/craft businesses. Several of the episodes have been great but just last night I was listening to Craftypod's Sister Diane interview Jennifer Perkins of the Naughty Secretary Club fame about how she was marketing her (then) upcoming book.

You may call it the Universe but I feel like God's directing me to the resources I need to understand this next challenge. I'm positive He'll continue to lead me to the right situations and people so that I can get the word out. And when I'm feeling overwhelmed I re-read the Kelly Rae Roberts quote above and I remember that although hard, this too is important. 

So there's the story, and some of the resources I've run into. I KNOW that many of you are in the midst of this same learning experience or are approaching it so I'd like to encourage you to check out the books and podcasts for yourself. Then, if you have any resources you've found particularly helpful I'd love to hear them and I'm curious about how you feel about your marketing efforts. Is it easy?fun?challenging? I'd love to know!

Tuesday, July 20, 2010

A Scaaarry Story- The weeks prior to my Etsy Shop's Opening

It's coming... my shop will soon be two. So like any good mom I'm looking back at the milestones of the last two years and thinking a bit about the beginning.

I'll try to tell you how severe my "butterflies" were at the thought of opening my first shop. They felt more like swallows divebombing at full speed into my stomach lining. I was crabby, horribly twisted up feeling and tense through the shoulders like you wouldn't believe. All this for weeks before I listed my first item. I feel pretty sorry for my husband in retrospect. I can remember him looking at me and saying, "are you sure you want to do this? Cause this doesn't look like something you're looking forward to doing." I know it didn't look like I was reaching out to grasp a life long dream but seemed more as if I was anticipating gall bladder surgery.
My Etsy Shop's Banner

It was just plain scary. By listing my work I thought I was inviting people to view it, judge it, dislike it, love it, buy it, or ignore it. My work is who I am and it felt very very personal. Anyone who's ever done a critique session in a college art class knows the trepidition with which you pin your work to the board. It's with a prayer to be kind, to be constructive not destructive, you're hoping for encouragement from strangers and the risk of an unkind remark or flippant judgement can be paralyzing.

The first item I listed- My Scribble Heart
But I did it anyways. AND if any of you are contemplating taking this step, or starting a blog, I have to tell you that the experience was NOTHING like my fears. Instead of standing there holding my work up before the world I merely sat at my computer, in my home, and uploaded a few photos. There was no dealing with judgements, kind or unkind, there was no sneering comments from passerbys. Instead I found encouragement, a community, friends, and lots and lots of hearts. I didn't have to try to sell my work, people would view it and if it called to them they bought it. There was no convincing, no pushing. I love that. Because really I don't want to push my work on people I want them to see it, and if they love it, buy it. If they don't love it, that's fine with me because I really really want the people who purchase my work to belong to it, if you know what I mean. 

But I was scared and I want to tell you that it's ok to be scared. You're fearful because you're taking a step into the unknown. It will be ok , you can do it, and the satisfaction you'll feel for having been brave with your work will be a high that will propel you to do more. To risk more. To dream of more. I know in my soul that you too can do it. After all, I did. :)

Monday, July 19, 2010

Discoveries in the Details: Art Fair Designs

Anytime you do something new for the first time there's a lot of "figuring things out" that you do. The logistics of how or when or what all come into the planning. It sounds tedious but there's a lot of discoveries that are made because you're asking these questions. Here are some of the discoveries I made getting ready for this weekend's art show (my first ever).

Discovery #1: Multi Use Business Cards

I had help with this one. I was looking for a way to use my cards more effectively and I'd noticed that some artists were using their cards as their hang tags at shops, fairs, etc. It seemed like a good way to get my info out and I thought if they were cute I could also use them as little "thank you cards" to insert into my etsy packages. When I told my friend Shelley of Single Stone Studios (who did my banners and avatars) how I wanted to use the cards, she came up with this SUPER CUTE notebook paper design for the back. Now I can write the title of my book, should anyone ask, use them as tags, or as thank you notes and they look adorable.

My fabulous friend also did a riff off of the business cards to come up with a banner display (see top photo) for the booth. This is something I decided to do on Tuesday of this week. It was a last minute decision and silly me I thought I could just use my etsy banner. I am so glad I checked with Shelley though because apparently- who knew- the banner would not have blown up well and a new design was necessary. Shelley stayed up until 1 am redesigning the business card into a fabulous banner that I was then able to get printed by Friday. I am SO GRATEFUL because I really think the banner is what drove the traffic from across the street to my booth. I mean it's just SO cute. The author/artist thing is a little hard for me, but I figure I need to get used to it and I want to reuse the banner for future events.


Discovery #2:Canvas Display Panels
I needed to find a way to display my hanging art in a rented booth.
It couldn't be bulky because I didn't have a truck to transport, it couldn't be expensive because I was trying to keep my costs down. So I decided to make canvas panels that would hang from the tent's metal infrastructure. The heavy canvas duck would support my sculptures, would fold up fairly flat, and would be a neutral background that I was hoping my black wire work would show up on well. I was able to use safety pins to attach the sculptures which made them easy on and easy off, but also fairly secure once on. They were also extremely moveable and I was really pleased by how quickly everything went up.

Discovery #3: Cute Recycled Shopping Bags
I wanted to provide my customers with a bag to carry their purchases but I didn't have the time or money to order the cute little handled bags from Uline. I've really been trying to reuse what I have so I dug through my grocery bag stash and found a bunch that had only been printed on one side. That left the other side free for embellishing so I used the iron on interfacing I had left from my clouds and stiffened the fabric. Then I traced my bird shape onto the paper side of the interfacing, cut out the shape, and peeled off the paper before gluing the shape to my bags. Super simple and I have tons of the cut out birds left that I think might look cute on my etsy boxes. We'll see how they ship. :)

Discovery #4: Easy Tiered Table Display
To make a multi leveled display that was simple and secure I decided to simply create two stacks of vintage books on either end of my table and then lay a board across them. To make the board more attractive I wrapped it with a thinner weight of canvas duck. That also tied it together with the canvas panels behind. Super easy, super quick, super effective!

Wrap Up: The rest of my display was pulled from my garage. The bookshelf had been sitting in there forever, the table was one my mom had purchased for me from a garage sale in Montana (thanks Mom!), and the stool I used was from my studio. I had another display fixture I got from a rummage sale but it kept breaking and then finally wouldn't fit into the car. Everything else did though and that was fabulous! The entire booth went up in about 45 minutes which was cool. I'm actually really pleased with the solutions I found to all my questions. Problems, I've discovered, can really be a fabulous spur to our creativity!

Sunday, July 18, 2010

Playing Catch Up

Yesterday's art fair was a fabulous experience. I loved meeting people, getting an idea of what pieces of art you gravitate to, and getting an idea of what people are interested in. It also felt great to get one of these events under my belt. I've been wishing to be an artist in an art fair since I was my son's age so this was a long time dream come true. I enjoyed myself all day- my smile was HUGE. It was mid 90's and sweltering, but I had a blast. It certainly helped that my husband was so supportive and encouraging. He stayed by me all day. I am SO grateful for his help.

This week I'll be playing catch up. It sounds like the grown up version of a child's game, doesn't it? And maybe if I approach it as a game it won't be quite so daunting. But after taking a week long vacation in early July and spending another week or so throwing all my energy into my first art show appearance I feel in dire need to "catch up" on the rest of what's important.

Here's the list:
- I need to catch up on housecleaning.
- I need to catch up on organizing and planning here at the house
- I need to catch up on some rest time (hopefully by spending time with my family)
- I need to spend some down time with my little boy who's been going going going..

Now some fun stuff:
- I want to catch up on YOU! Writing a few blog posts, reading your blogs, replying to your comments, and getting back into the swing of things.
- I also want to get some more art listed on etsy and maybe do a little creating just for the thrill of it. We'll see.

Tomorrow I'll give you a close up look at some of the details that went into art show. I was super blessed to have a friend's help with the design and I can't wait to give you the tour. My shopping bags turned out pretty cute too. I used fabric cut outs to make my recycled grocery bags pretty cute. So see you here tomorrow!!!

Thursday, July 15, 2010

Art Biz Mama's- Interview


The art fair prep is in full gear today and I have my last plein air watercolor class. That 6 weeks went by so fast! So today I thought I'd send you over to check out an interview I did for Dana Barbieri. She's another artist/mom who's living the creative life and because we have so much in common I knew the questions would be great ones and applicable to moms & artists. They were. :)

The interview is part of a series she does called Art Biz Mama's and if you have a chance, check out some of the past interviews in this series on her blog. They're fabulous and insightful!

Plus, check out Dana's art when you're over there. I love her patchwork effect with paper and paint. Enjoy- I'm off to work.;)

Wednesday, July 14, 2010

Iron On Applique Tutorial

I've been getting ready my backdrop for the art show on Saturday and spent a little time adding cloud appliques to it yesterday. They turned out pretty cute so I thought I would briefly run through the steps and tips in case you'd like to give it a try.
------------------------------------------------------------------------------------
Appliqued Clouds for a Large Canvas Backdrop

Tools and Materials
Fabric to applique on to
Fabric to cut applique out of
Scissors
Ultra hold sewable iron on interfacing
Iron and Ironing Board
Old towel
Embroidery floss
Needle

Step One: Select the fabrics you'll need and then cut out a piece (if necessary) slightly larger than you're desired applique. I knew roughly what size to make my clouds so I cut pieces a couple inches larger on all sides in a really rough shape. Flip fabric over and cut interfacing to cover the fabric. I'm piecing together left over pieces from other projects in the photo. Tip: it helps to do this step actually on your ironing board so that you don't have to carry the fabric and interfacing to your board.


Step Two: Following the manufacturer's instructions for ironing on the interfacing, iron your interfacing in place. You'll be ironing the paper side of the interfacing to the wrong side of you fabric. Tip: Before you iron place an old towel under the fabric you'll be ironing. This protects your board in case some of the interfacing glue gets on it. Also, you should be using an old iron for this that you don't actually use to do laundry anymore. That way if any glue residue gets on the iron it's ok. You could also choose to place a cloth over the project and iron through that.

Step Three: Cut out your shape as desired.


Step Four: Peel off the paper backing of your interfacing.


Step Five: Using your embroidery floss and needle, stitch along the outline of you shape.


Step Six: Iron your applique to the fabric surface you chose. As you iron any of the slight creases or puckering that might have been there after ironing on your interfacing will smooth out.


Monday, July 12, 2010

Thoughts on the Interaction Between the Maker and Beholder

Original Picture (unaltered)
Ok- disclaimer- I am no techy, but my husband (a techy) just got me a smart phone (thanks honey!) and I've found this fabulous photography app. It's called lo-mob and it's now my favorite thing to do when I have a few seconds to play. Of course, since I love it I had to share it with you all. :)

What it does is take any photo from my camera roll and it runs it through a selection of filters. There's about 25 to choose from ranging from a slide look, a medium format camera shot, a polaroid look or a couple of dozen others. What I've done is take one photo from my collection and process it different ways so that you can get a look at what I'm talking about. You can also check it out for yourself at lo-mob.com.


Pretty Cool, huh? Smart phone or not, this is a fun reminder that we, as artists, can control an image whether it's a photo, a painting, necklace, or sculpture. We can manipulate it, stretch it, darken it, crop it. Then, when we release it into the world we're giving that image as a gift to others who might not see as we see. There's an interaction between the creator and the viewer that I think we, the artist, sometimes overlook. We make something and put it out into the world, but we can't control how others view or interpret our work. That's beautiful to me because that means that what the viewer brings to our work is as important as what we bring. Once the viewer interprets through their personal lens then they are connecting to the work. Once they connect to the work then they have personalized it and THAT makes it theirs. From a marketing stand-point that's what we, the creators, want because that is what will turn that person from a viewer to a committed buyer. I believe that's one of the reason "inspirational" art does so well. It makes the connection quicker but it also limits the viewer somewhat to seeing what the artist sees in the piece. Adding the word "believe" or "fly" will surely help the viewer who wants to believe or has the longing to fly relate to the work and even see it as a personal talisman. How do you want others to connect to your work? Have you ever considered the viewers' role in the life of your art? Just some food for thought.

Saturday, July 10, 2010

My Art Helps Support...

Juyona and me at the Taste of India.
Two years ago I was visiting my dad and met two amazing people, Raj and Juyona. They're married, from India, and they run a ministry there that includes an Orphanage, Evangelism, help for the widows, and the handicapped. They founded the Orphanage a few years before I met them after seeing the need for a loving and caring place for children in their region to live. These children have been abandoned at hospitals, by mothers who can't care for them, or they are found by orphanage workers, living in the streets. They are brought back to Mercy and given a home. They are given food, family, and an education. In short, they are given a future. I don't have the statistics in front of me, but a huge number of these children would have ended up in the human trafficking industry. The Orphanage has a big wall around it and is gated. To keep the children safe.

Last week, I had the pleasure of meeting Raj and Juyona again. This time they had a book with photos of their experiences. As I was flipping through it with Jasper, my little boy, he stopped me and pointing to a photo asked me why that women didn't have any fingers. I took a second look and realized what I thought was a photo of the widows they've been visiting were actually photos of a leper colony they'd visited. It wrenched my heart but was such a good opportunity to share with Jasper.

Slum kids scrounging for food- they're now at Mercy.
In the Bible God asks us to take care of the children, the widows, and the outcasts. I've struggled in the past to see how I fit into this. God made me an artist. I've wondered how I could use these skills to help others. I make pretty things. They aren't necessary items but they do reflect the beauty around us. The beauty God created for us. By giving from my sales to this ministry I feel like I'm helping. I'm not there visiting the widows, or cooking for the orphans, but I'm helping the way I can. Although you can choose to sponsor an orphan, I've chosen to give my contribution to their general fund or building fund. They're currently building a second orphanage. This one will house 450 orphans and widows and is set up in family units so that the widows without families, will have 3-4 children to care for and mother. It's an awesome, inspired idea that I just love. 100% if what I give goes into their ministry. I want to encourage you to visit their site. Find out more, tell someone else- God can use you in this way too. 

Below is a video of a visit to Mercy made by the woman who coordinates US sponsorships and aid. She is handing out letters from the sponsors to the children. It's a great look at how huge an impact a small act can make.

Friday, July 9, 2010

Paint a Backdrop- Check!


Pocket Lake
We got home from the lake yesterday and I was amazed at how immediately it felt so good just to be home. I was also amazed at how quickly the "to-do" list grew from the moment I went through the door. As I walked through the house putting things away, I mentally took note of all there was to do. Vacuum, dust, laundry, grocery shop, sort, pile, and toss. Crazy. It made me long to go back to the lake. But instead I soldiered up and ordered a pizza for my boys and started to clean up a bit. :)

Getting started...
This morning I got right to work on a backdrop for my church's VBS program. It's been on my "to- do" list for more than a month but I put it off because I didn't know how to do it. "Just paint a sheet" were the instructions I'd been given but in my mind I was wondering the where, how, with what, and when questions. Do I use acrylics or do I try to do spray paint? Would I aphyxiate myself if I spray painted it all? Of course, I'd do it on the lawn, but how do I get the sheet to stay still? Maybe I should use acrylics, but then I'd have to buy acrylics. Maybe I should buy a stiffer fabric....

Add a few details and FINISHED!
So many questions! In the end, I pulled out my pints of leftover latex and spread out my big ol' drop cloth on the lawn and just painted the sheet. It really didn't take long, it's drying in the sun right now.

For weeks I worried about this and it was done in a little more than an hour. It's just crazy how I can build things up in my mind and make them much more difficult than they really need to be. Do you do that? Do the little things overwhelm you so that you feel you don't know where to begin? The art fair I signed up for is next Saturday. I have a whole slew of "to-do's" for that as well. I'm hoping, as happened with this backdrop, that the execution will be a lot simpler than I've anticipated. I have a display unit I picked up at a garage sale to remodel, the canvas backdrops to stitch, and an old bookshelf to rehab as a little check out counter. I'll keep you posted. :)