Friday, April 30, 2010

We Interrupt our Regularly Scheduled Posts.....

What? Posting twice in one day? Am I mad? Maybe a little;) But really it's a time thing. I just had to write and encourage you all to celebrate May Day with your families this year. Of course tomorrow being May 1st, I kind of ran out of time.
may day photo Pictures, Images and Photos

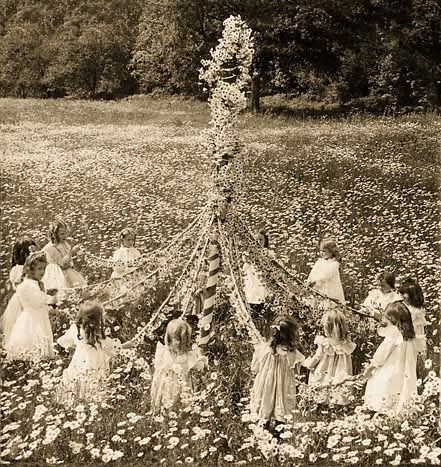
May Day is special and a holiday not every one celebrates. My mother always made a point of making the day special for my brother and I growing up and now. Tomorrow morning the May Day man will ring the doorbell and leave yummy chocolate and oatmeal drop cookies on our doorstep. When I was young he left them in those little green plastic strawberry baskets that you used to buy berries in. He would ring the doorbell and run. A few minutes later my mom, a little out of breath would show up in the kitchen, conveniently near the patio door. It was something she always did for us. Yesterday I found out it was something her mother had begun doing for her and her sister. It's a simple little thing that made the day unique so I want to encourage you to do something too.

Maybe you want to leave a posy for your neighbor, or even just set a dandelion on each breakfast plate. Maybe you want to turn lunch into a picnic, or toss some strawberries into the orange juice. It's up to you. A sweet little note that says "happy May Day", or a May Day kiss on the cheek. If however, you are interested in the May Day tradition as my family celebrates I'll post the recipe below. It's super yummy- I promise!

----------------------------------------------------------------------------
May Day Cookies
(cocoa and oatmeal drop cookies)
Mix together in a bowl and set aside:
3 cups oatmeal
1/2 cup coconut

In a small saucepan combine and bring to boil for one minute:
3 tbsp. cocoa
2 cups sugar
1/2 cup milk
1/4 lb. butter
Add to wet ingredients: 1 tsp. vanilla

Pour cocoa mixture over the oatmeal/coconut mixture. Mix together well. Drop onto waxed paper. Set aside to cool. Work rapidly before they harden. Be careful not to snitch until they've cooled somewhat or you risk burnt fingers!

Yields 20-30 cookies Yum!

(photo of cookies from AllRecipes.com- no photographer listed, photo of May Day celebration from photobucket posted by dymphnasis)

Thursday, April 29, 2010

Tutorial: Transformed Tins (Part 1)

Visit a flea market and you'll find a ton of these. Most garage sales can hook you up. Find a rummage sale and you'll find a gold mine of... tins. Odds are if you search your garage or attic you'll even find a box of these. I've an idea- why not try using them as a metal substrate in your mixed media art? Either the cover or the container itself are fabulous bases for either a shadowbox assemblage or a collaged wall hanging. I'm sure the more you give this some thought the more the ideas will come. I'd love to know what you come up with so please leave a comment if something occurs to you. Together we'll transform the tins of the world into art. :)
--------------------------------------------------------------------------
"Fly"- Collaged Tin Cover

Materials and Tools
Cover to an old metal tin
Gesso
Acrylic Paint
16-gauge steel wire
Embroidery Floss
Butterfly Sticker- Artsy Urban by Melody Ross
Scrap of vintage book paper
Glue stick
Pencils- 2B and white colored
Ink pad
Clear Acrylic Alpha Stamp Set and Block
Paintbrush
Needle
Scissors
Wire Cutter
Cylinder with 1" diameter
Crop-a-dile

Directions
Step One- Using a paintbrush or sponge brush, cover your entire tin cover with gesso. Let dry. Don't worry about even or perfect coverage here. Applying the acrylic in the next step will cover up any text or imagery that's on the tin, but I rather like some of it showing through on the backside. .


Step Two- Choose a color and haphazardly paint the tin with acrylic paint, letting some of the white of the gesso show. I used the pool color by Ranger. It comes in the little daubers. I wouldn't recommend buying all your paint in these little things. I just happened to have it on hand and wanted this color. Much cheaper to buy it in the craft bottles. :)

Step Three- Using your 1" diameter cylinder, wrap the 16-gauge wire around it to form a coil. As you wind, slide off the coils, and continue to wrap until it's your desired length.


Step Four- Using your hands, flatten and then seperate the coils to form loops. Their shape and whether they overlap or not is the result of how much you seperate them.


Step Five- Cut a 24" length of embroidery floss and tie one end to the end of your looped edging. This is to anchor the floss.


Step Six-
Use your wire loops as a guide, and with a 2B pencil, place a mark where you'd like to make a hole in the tin's edge. Mark at the point that the wire crosses at the bottom of the loop. That is where you'll be stitching your wire to your tin. Using a crop-a-dile, chomp 1/8" holes into the edge of your tin where marked.


Step Seven- Using your needle and floss, begin to stitch the wire loops to the edge of your tin as shown. Go over and around the wire, and through the hole in the tin.


Step Eight- Then with needle and thread, cross over the wire that is in between the loops and bring your needle to the back of the tin and ready to insert into the next hole. Then from the back, bring it through the loop again, and then insert into the hole. Repeat until entire length is tacked down.


Step Nine
- When you've reached the point you started at, cut any excess wire and wrap the cut end around the first loop you stitched down. Finish the piece by adding the sticker. Then cut out a bit of old book paper and using a clear acrylic letters, stamp the word "fly". Doodle with pencils around word. Use a glue stick to adhere below the butterfly stamp.

Monday, April 26, 2010

Time in the Studio= New Work!!!

Lots of new stuff to make in the next week or two- it's made getting a post done difficult. My sketchbook is overflowing and it's just a matter of getting it out of my head and into my hands. Or your hands as some of this will be available for purchase in either the Etsy shop or at The Studio at Rush Creek.


Finding time to work on my art is always difficult. I'm sure it is for you too. Time spent making art is time away from the family, the to-do list, and other commitments. So it was really wonderful to be able to have some free time this weekend to work on some projects. One of the projects was this mixed media corkboard. The other is this little photo holder. Both are newer versions of previous projects. The photo holder can be found over at Etsy later tonight. The corkboard will only be available over at The Studio at Rush Creek for now while I work on a way to ship that size item.


I've also a new mixed media in the works, a couple of tutorials, and a few more storage ideas to share. SO have a good Monday and see you soon!


Friday, April 23, 2010

Today's To-Do's

Yesterday's to do list was awful. Clean the house, wipe the nose and hand prints off the windows, figure out what made that stain on the carpet, and do all those little things that need to get done only when you have company coming. Oh yeah, and package and ship some orders, make a trip to the grocery store and get ready to entertain...I do like to have friends over though so it was all worth it, but today should be more fun.

Today's to-do list reads:
  • Clean up leftover dishes from dinner party
  • Play with new collage
  • Take my son to the park for a picnic (if weather's nice)
  • Cuddle with my kid while reading the latest adventures of Doyle and Fossey, fifth grade science detectives (if weather's not nice)
  • Page through some new craft books
  • Write a to-do list (check)
  • Write a blog post (double check)

Sweet! Two done already!!!! What are you going to do today? Is anything creative on your list? Just wondering.....

Tuesday, April 20, 2010

Today's Theme: Tension


Overflowing and Overwhelming
Sometimes themes in our lives just appear. We don't have to search for them or pull them from our innermost beings, or borrow them from someone else. They're reoccurring thoughts that just seem to come to us again and again. I've heard some call this process "ruminating" or "pondering". I've also heard others describe the thoughts as "whispers" and or perhaps "signposts". Today I woke up thinking about the word tension. I've never pondered the word before but lying in bed this morning I thought about what it means. Tension in a situation is usually considered bad. Tension in a relationship could be good- if it's an excited or anticipatory tension, or it could be a little scary. As in "the tension between them created anger on his side and bewilderment on hers".

Creating the necessary slack
The tension I deal with primarily in my work is physical. When I bend and wrap wire I try to use the tension of the wire to my advantage. I've learned to manipulate it as well. When I begin a sculpture, the first thing I do is throw the spool on the floor and pull up a length of it, wiping with a rag and straightening it slightly as I pull. Try working with wire straight off the spool and it's all spiral-y and much more difficult. Throwing it on the ground gives me a 1-3 ft. slack that eases the tension of the spiral. If I was to cut the wire and work with it as a piece, instead of from the spool, then I've noticed my work looses much of it's gracefulness and fluidity. It's working with the right amount of tension that allows me to get the smooth lines and curves. So here was a case where tension, handled correctly was a necessary and good thing all together.

Simply organized and ready for inspiration to strike!
The other tension I experience is a tension-anxiety. This seems to be most evident when I feel like I have a deadline approaching and I feel overwhelmed. My house actually makes me feel like this often. My studio room ESPECIALLY. It overflows with things that don't really have a home, that fill up my working space so that I don't feel like I can work in it. I end up on the dining room table instead. The larger space of the living room/dining room combined with the clear flat surface of the table allows me to think and process the "to-do" or steps of the project. But I love my art room and would really like to be able to work in it and not just use it as a big supply closet. So I decided to give the organization a go. I started with the fabric. Please note the chaos of the first photo. That is soooo symbolic of my life. Then there's the nicely organized, you can see all the colors, and fabric patterns. This is what I would like my life to be. Somewhere in between these two however, is the comfortable life. I have tried living with all my ducks in a row, all my folds correct, all the patterns showing and it doesn't work for me. Without the tension created by the chaos I wouldn't ever take the time to change-I'd be immobilized. So after a little ruminating, I have to believe that tension, like boredom, necessity, and fear are all positive emotions. They are the emotions that cause me to take action and change- without them life would be static. And really very very boring. :)

Friday, April 16, 2010

Tin Can Inspirations

Soda Can Flower Pendant
What to do with tin? Shape it? Cover it? Cut it? Stack it? The artist behind the flower pendant at left tried it all when she created this mini work of art. I stumbled on Monica Marie's shop when searching for tin can creations on Etsy. I've been playing around with a few myself and wanted to see what others are doing. Here's some of the crafty goodness I found....

The Bird and Nest embellished tin can below was created by Faith Meadows' Designs and is part of what she terms her new "tin treasures" line of items. While this can was covered, painted, and embellished it's actual shape wasn't re ally altered.


Then there are the tin tops. What to do with them once you've opened the can and cut them off? I toss them into the recycling with this reluctant "I should be able to do something with this...." feeling. They seem a little large for pendants (although I suppose I could use the tomato paste lids in that way).

But I
LOVE the solution picardcreative on Etsy came up wit
h. She creates these outrageous, "sassy girl" MAGNETS out of them. How super clever is that??

So there's a few ideas to get both of our minds whirling... what would you do? Would you create a curtain of tin can lids? Would you stack the cans, make little banks, or planters of them?


 Edit: I'm at my mom's and showed her the tin can from Faith Meadows and she loved it and bought it! Thanks Mom for supporting handmade!

Thursday, April 15, 2010

Handmade Information

Recently I've been searching out information that will allow me to create a better blog, a better Etsy shop, and basically educate me on the business of selling and promoting the crafty handmade. I began with the preconceived notion that a)there wasn't really all that much out there and b) that I would have to wade through a lot of repeat information to find anything valuable.

I was so wrong. While there is a lot of repetition out there I've found some really fabulous information very easily and quickly. I value that. As a stay at home mom I never know when I'll be able to hop on and do a little searching or how quickly the time that I do have will end. I'll grab a coffee and sit down thinking I have the morning and a scant ten minutes in will be jumping up to transfer laundry, or to get the phone, or rush to the post office to mail a package I forgot about earlier. So everything has to be squeezed into these little increments of time that fall between everything else. Because of my time constraints, I like blogs and e-newsletters, especially the e-newsletters. All this information just lands in my e-mail each morning ready for me to open and scan whenever I have the opportunity.

Of these, I really like Timothy Adams' Handmade Spark e-newsletter. I admit I subscribed so I could get the free blogging blueprint he was offering BUT I've been receiving this daily for about 4 or 5 weeks at least and there is always SOMETHING that catches my eye. He usually includes some lovely Etsy eye-candy but also has some great guest writers sharing business tips, photography information, better blogging ideas and the like.

There's MORE!!! Here are a few yummy looking blogs I found while searching and a little bit about how they describe themselves-
Meylah :
"Here at Meylah, our goal is to help creative folks succeed in building their businesses online. We know it can be tough, but with our weekly entrepreneurial advice and social networking know-how, you’ll be one step closer to success".

Buzz Blog:
This blog just launched but I've chatted with the editor and I think she's going to be worth reading. Here's the description- "Create some buzz with the Buzz Blog! Learn (& share) about indie business topics and other fun stuff for the craftily self-employed! The Buzz Blog is edited by Jen Wallace of Buzz PR and Indie Fixx"

Handmade Business Blog:
The Handmade Business Blog is a collection of posts about selling handmade products online. Site reviews, tips, advice, and tools for use with Etsy and other selling venues. (Squidoo)

If you'd prefer not to get it as a newsletter, the same basic info is available in a blog format at the Handmade Spark Blog.


The Art of the Business Blog:
"A blog dedicated to artists serious about their business." Check out their recent post about scheduling your social media efforts here.

The Storque:
The other fabulous resource for all things etsy related is Etsy's own blog/community The Storque. They constantly have forum threads running about anything and everything etsy.

Wednesday, April 14, 2010

How does Your Conversation Go?

Yesterday I pulled out a big canvas I'd prepped the other day and started to paint. I have a big spot at the top of my stairs and I've been envisioning a landscape there for some time. I wanted it fairly abstract, I wanted to feel renewed and connected with God when I saw it, and I wanted it fairly large. So glopping the paint straight on to the canvas, and with my 3" wide flat I started to mix the paint and spread the paint.

I love these moments. It's all about feeling the medium and there's an interaction that takes place, almost like a private conversation between the painting and me. I'll smear some blue and it'll say "oooh ooh- and I need green over here" or "now you need a streak of orange over there". It goes on like that for a while. Sometimes I'll try something and immediately see it doesn't work, or that it might work but only if I do.... The painting or collage is done when the conversation ends. Every once in a while I'll get an insight or inspiration that amazes me and that's when I feel like the Holy Spirit has swooped in and entered the conversation. I feel as if the time creating, and the work I'm creating are both blessed then.

I wonder if this makes sense to any of you. I wonder how your creative experiences go. What does your inner voice tell you as you're working? Mine goes through elation, frustration, (horror sometimes when I do something REALLY off), and eventually I reach a state of satisfaction and peace. Not always, but usually I can get there.

What is your process like? Is it less of a conversation and more of a dance? Or is your experience more prosaic, do you hear a "here-here-here- and here". Never a "oops-NOT THERE!" That wouldn't be wrong, just different than I experience and so I'm curious. What is it like for other artists? Is there a conversation at all?

Just some thoughts I had this morning, that I thought I'd throw your way. Hope you have a fabulous day and Happy Creating!

Tuesday, April 13, 2010

Spring Inspirations- New Tray Collages!

So I know I've shared with you in the past how much I LOVE Odilon Redon's pastel paintings of flowers. Because of this great love of mine I return every once in a while to the vase arrangement as a composition in my own art. Apparently it was time again because when I sat down last week to play around with another tray this floral arrangement was what came to me. It's cute and I liked playing with the patterns and colors of the fabrics. The buttons were a fun addition too.

The second piece, Bloom, was inspired by my new Fossil purse (which I sooo shouldn't have gotten but I really really love it- and I had a coupon). :) But now that I made something inspired by it I somehow feel a little bit better about the splurge.

Monday, April 12, 2010

Sketched, Sculpted, & Stitched

Thought I'd share some photos of a project I've been working on. I was asked to do some wire and fabric daffodils and since I haven't done this form of flower before I thought this would be a good chance to share my artistic process.

Step 1: Sketch the form from Life
It's easier for me to grasp the spatial dimensions of a piece if I'm able to sketch it first from life. Sculpting directly from a photo or from memory seems to result in a creation that feels rather 2d-ish. I have used a good quality silk flower stem to draw from before. This works pretty well as you can bend the stems or twist the form as desired to create different angles and "poses" to sketch. It usually takes me at least 2 times to sketch something before I'm satisfied I have all the information I want.


Step 2: Choose the materials
Pretty fabrics, wire, and embroidery floss are the only materials in this sculpture. The wire is a 16-gauge galvanized and the fabrics are cotton quilting fabrics.


Step 3: Sculpt the image with wire
Following the lines on the actual object ( the daffodil) or the sketches as I sculpt the wire gives me the feeling that I'm actually drawing with the wire. Imagine you're doing a line drawing as you manipulate the wire and you'll get the idea pretty quickly. This gives a lovely free-formed "sketched" quality to the work that I just love.


Step 4: Stitch the fabric to the wire
Adding fabric to the wire creation adds color, substance, density, and pattern to the wire sculpture. Although I love how the sculptures look without the fabric, adding the fabric seems to add to their personality. Each stitch in fact, becomes a little added linear element that creates a rhythmic border around the piece. This is a personal preference- I have lots of customers who prefer the pieces sans fabric.

What's your artistic process like? How do you create? I'd love to know!!!

Thursday, April 8, 2010

Prep*Work


Prep Work. It kind of says it all right there. Prep is something we do in advance to make something ready, usually in anticipation of a commitment of time or otherwise. Work is the mundane, repetitive things we do in order to achieve something greater. My life seems to consist of a lot of prep and work right now. Here's some of the things I've been working on:
  • Wire work- so I can stitch up a few more flowers to send to my editor and designer to play around with as they work on the layout and design of the book.
  • Writing up an article to send off to a magazine.
  • Researching the blogging world, who's here, which platforms are the best, what are my options with say, Wordpress vs. Blogger.
  • Improving my blog. I'm no html genius so it's been going a little slowly.
  • I'm saying no to my son quite a bit lately, and taking the time to explain the right and wrong in situations. Really I'd rather not have to, but we're building character :).
  • Gardens- I've done a bit of pruning and raking trying to ready the space for spring.
  • Home- I honestly haven't put enough time in and the place needs a spring cleaning bad.
  • Projects- I've done quite a bit of gesso-ing over old paintings and boxes lately, preparing to paint them. I've also been helping a friend prepare the decorations for an event she's sponsoring in May. Again, the end result is going to be fabulous!
When we, as artists, mothers, gardeners, or friends, invest time preparing for something we are investing in the future. We are preparing for a season of growth in our art, personal lives, or life experiences. It's a little mundane at times, but so worth it when you think a bit about it. All the actions I've been taking above will pay off. The magazine will come out and I'll have that thrill of seeing my work in print. This blog, will eventually be completely kick ass. My home will be clean and I'll be able to enjoy the space and beauty it contains. The projects- well, they'll be fabulous or not, can't tell yet, but I've taken them to the place they need to be so that I can create the fabulous. My son will grow up to be thoughtful and caring of others. It'll all happen, but I recognize that it wouldn't if I don't put the time in now. It's all good, it's all right, but none of it is easy.

What are you preparing for? What do you find yourself doing now, to prepare for future success? Where do you put your time and effort? Just some thoughts I had this morning.... :)

Wednesday, April 7, 2010

The Connection between Inspiration and Motivation

It amazes me how hard it used to be to come up with an idea for my art. Any idea at all. I would sit here, at the dining room table, with pastels in hand and my sketchbook in front of me and nothing would come. I'd look outside and think "how beautiful". But if I tried to draw what I saw, nothing would come out right and I'd end the time more frustrated than I started.

Now inspiration comes frequently and almost casually. This morning, all it took was a quick glance at a photo of an artist working on her project to get me up and going. The image of what I would make popped into my head in a moment. I see trees waving, spring birds, and deep greens against a bright robin eggg blue with some earth tones thrown in for depth. Now, when I look at my blank paper I can envision the sketch completed. Like Michaelangelo's famous comment about seeing the angel in the stone and carving to set it free, I can now mix reality with the imagined in my mind to the degree that I can "see" them combined. When I look at a wall, I can see the painting I want to put there. I don't have to draw it out to see it any longer, but I used to. My sketches are mostly visual notes now.

Being able to visualize, the instant inspirations, the dozens of ideas; these are all benefits anyone will experience once they've committed to creating. It starts simply, although a bit tediously. Like learning a new language, I put my time in relearning the rudiments of my art. I kept a sketchbook, I drew whether I felt like it or not, I searched out new mediums and techniques. The key, according to many great artists, to feeling inspired, is not a great imagination but the ability to work, whether they feel like it or not. Often the greatest are those who were simply tenacious. They could not, would not, give up. In mind, that means inspiration is the result of motivation. How do you motivate yourself to work? Do you have goals, dreams, aspirations? Is it something you love the feel of doing? Do you have a set time for creating or do you wait to find those times when you "feel" like it? Leave a comment- I'd love to know what motivates you to create.

Here are some of my favorite quotes on the subject. Enjoy!

"Amateurs look for inspiration; the rest of us just get up and work."- Chuck Close
"Don't wait for inspiration. It comes when one is working." - Henri Matisse
"Inspiration exists, but it has to find you working. " -Pablo Picasso
"I'm not inspired every day I go to the studio, but you've got to push yourself. Do it every day and once in a while things will really click. That's the biggest high you can imagine."- Jamie Wyeth

CRAZY!!!! My Book on Amazon!!!

Browsing the web last night I googled the name of my upcoming book thinking I'd see what other Creative Bloom sites are out there and already taken. Found a design company in Canada and few other miscellaneous things and then... I saw it!!! My book is now listed on Amazon.com. I kind of can't believe it.

Here's what it says:

Creative Bloom: Wire and Fabric Projects to Cultivate your Inner Artist (Paperback)
~ Jennifer Swift (Author)

Product Details
  • Paperback: 128 pages
  • Publisher: North Light Books; 1 edition (November 17, 2010)
  • Language: English
  • ISBN-10: 1440303169
  • ISBN-13: 978-1440303166

Wow!!!! Pretty amazing!!! The fact that I have a book coming out still doesn't register sometimes. It isn't something that was even on my "someday" list a few years ago. It didn't seem possible. Pretty amazing example of what God can do in our lives!!!

Tuesday, April 6, 2010

Coming in April- Making Wire and Fabric Flowers Studio Class!!

Create your own indoor garden
I would LOVE it if you would join me at The Studio at Rush Creek on April 22nd, 6:30-8:30 pm for a class exploring the how-to's of my wire and fabric flowers.

Here's what you'll learn:

  • How to form steel wire to create wire flowers of varied shapes and sizes.
  • How to make the most of your stash of fabric scraps.
  • How to stitch fabric to the wire forms to create 3D fabric art.
  • How to stabilize the fabric.
  • How to create bases for your sculptures with recycled corks and hardware store elements.
  • All the different applications for these flowers- including standing sculptures, keychains, even jewelry!
Use your favorite fabrics
This is a hands-on class so you will be leaving with your own little versions of these playful and whimsical blooms- ready to give or display in your home or office!

The class costs $24 plus another $10 for supplies. You will receive your own coil of wire, needles, floss, and fabric to work with and then take home. If you have a favorite fabric you would like to use- bring it with! To register either call The Studio at 763.315.3001 or reserve the class online at The Studio at Rush Creek.

Monday, April 5, 2010

Spring Finds on Etsy

Spring Showers bring May flowers- it's one of those lovely facts of spring. Lately any sighting of spring fills me with anticipation, like the daffodil leaves poking up through the brown leaf mulch or the return of the songbirds. "Spring, Spring, Spring" my heart hums. So this morning when I thought I'd share the beauty with some lovely spring themed handmade art that's sure to get you thinking spring as well!

Crochet Necklace

Type in "rainbows" in the etsy search engine and you'll find some super adorable art. I love this little clutch by Cut Out and Collect, it screams whimsy and spring.

Springtime Occasions call for a springy statement making necklace like this one from Nez Jewelry. The colors of this really appeals to my desire for all that is fresh and bright.

One more piece, this little mixed media print by Sascalia is the bee's knees in my opinion.;) It makes me want to get out and get gardening. I love all the pattern and color in this piece!!!

Happy Spring!!!


Sunday, April 4, 2010

Have a Blessed Easter!!!

Happy Easter! May your day be blessed with this reminder of the hope today brings!!!